zeal78
Seedling
"you have the updated filter head" how i can see the update?
New design:
If you’re using stop valves to restrict flow make sure to only do so with the outflow or it will suck air.
Last edited:

"you have the updated filter head" how i can see the update?
From your second pic, you appear to have the nut on the hose, put hose onto inlet then screw down the nut leaving two threads exposed. Whereas the manual shows the nuts put on the thread first, before fitting hose, and then screwing up a couple of turns?Hello everyone, here is a solution from Oase USA that totally stopped the air purging of my BioMaster thermo 600. In essence don’t push the hoses too far back on the inlet and outlet, the lock ring needs to be engaged far enough to create a seal and prevent air from being sucked in, especially important if using stop valves to restrict flow. Also make sure you have the updated filter head, Oase will send one out if you’re still under warranty.
“where you have your tubes attached, can you be sure that all of the tubes are pushed ALL the way down to the lip of the in and out and to your inlet and outlet, when you tie down the locking ring, make sure you can see two threads exposed on the opposite side.”
From your second pic, you appear to have the nut on the hose, put hose onto inlet then screw down the nut leaving two threads exposed. Whereas the manual shows the nuts put on the thread first, before fitting hose, and then screwing up a couple of turns?
just set up my 350 and am having the air problem, I did it the manual way and also have two threads showing
You’re correct, the nuts go on the threads first before fitting the hoses, then tighten the nuts to expose two threads. This is what I did in the second pic, first pic was for illustration how far to push the hoses down without the nuts obstructing the view. If you installed quick connector valves and/or inline Co2 diffuser check those connections also and tighten nuts in a similar fashion as the filter hoses. If restricting flow with one of the quick connector valves only do so on the outflow side and leave the inflow valve open all the way. Once you start the unit shake it gently backward and forwards, and from side to side to release the trapped air. If you’re using a skimmer on the inflow ensure the flow is not too strong as to suck air from the surface skimmer. And lastly do you have the new filter head design?
Sent from my iPhone using Tapatalk
Not restricting flow at all, yesterday I put silicon grease on all seals/o rings reassembled and once up and running. gently shook. This produced a lot of air. About 15 mins later I had a huge amount of air expel, then it was fine for about 15 mins, then another huge air expulsion. Now it's back to doing it every 10 mins or so, but doesn't seem to be as much as previously.
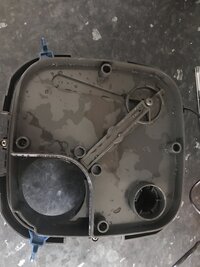
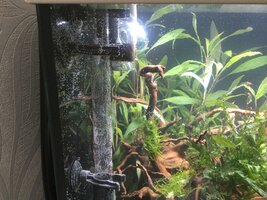
Have just taken head off to photograph as haven't a clue whether it's the new version or not (only bought late December 2020) and also included a pic showing the inlet/outlet on my tank (tiny bubbles on glass are because I just changed the water)
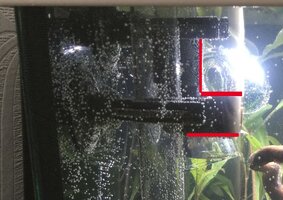
Thanks (Edit, added a 3rd pic outlining where the filter outposts to the aquarium as not very clear in original pic)
I have same connection hoses, it's don't pushed to far back. Don't have any stop valves, using updated filter head - and still, have air issue on my Thermo 600. 😢Hello everyone, here is a solution from Oase USA that totally stopped the air purging of my BioMaster thermo 600. In essence don’t push the hoses too far back on the inlet and outlet, the lock ring needs to be engaged far enough to create a seal and prevent air from being sucked in, especially important if using stop valves to restrict flow. Also make sure you have the updated filter head, Oase will send one out if you’re still under warranty.
“where you have your tubes attached, can you be sure that all of the tubes are pushed ALL the way down to the lip of the in and out and to your inlet and outlet, when you tie down the locking ring, make sure you can see two threads exposed on the opposite side.”
I have same connection hoses, it's don't pushed to far back. Don't have any stop valves, using updated filter head - and still, have air issue on my Thermo 600.
Also, can you please tell me, first link on pic - it's new head? Or the second one, with grip on locked mechanism of pump?
Oh, Yea, it's new one. Heater checked on old head, idk. I suppose it will leak if not inserted correctly. It is physically impossible to insert something wrong there. Seals at the moment, on new head - in original grease. On old head I used over the original, Aquael silicone lubricant - nothing has changed. Of course, I will try to do everything this again. Maybe allready in, somewhere, 10 times. But I guess it's a road to nowhere, and nothing will change. The problem for anyone is something else. Where I have not tried to do anything yet. It remains only to understand where exactly.....Hey, sorry to hear you’re still having air issues with air :-/ Both links are of the same filter head, and you have the new one. Sounds like you’ve checked everything, the only suggestion is to double check all the seals again including the heater one and make sure they are seated correctly. And your hose connections one more time and make sure the rings are tightened well. Moving the unit down to the floor will make a difference, it can take 12-24 hours for all the air to be expelled.
Sent from my iPhone using Tapatalk
Oh, Yea, it's new one. Heater checked on old head, idk. I suppose it will leak if not inserted correctly. It is physically impossible to insert something wrong there. Seals at the moment, on new head - in original grease. On old head I used over the original, Aquael silicone lubricant - nothing has changed. Of course, I will try to do everything this again. Maybe allready in, somewhere, 10 times. But I guess it's a road to nowhere, and nothing will change. The problem for anyone is something else. Where I have not tried to do anything yet. It remains only to understand where exactly.....
Maybe I should try remove originally blue nuts, and use coupler clamp on hose. I talked with my comrades, some one do this on Eheim filters. Since there may be a microscopic crack in the plastic of blue nuts....
I will continue my torment and experiments, if I don't give up on it, I will write here what helped me in my case.
Usually, after the head is removed once. 2-3 days of silence pass, and only then the air appears again. This makes it harder to find source of issue.
The shop told me that they have recently restocked them , but is there any way I can confirm that is the updated one by myself?If you buy new, it will be ver.2 probably with little modificated top.
Ah ok, that is good! I v asked the shop for clarifications and they returned back to me with no answer. They dont even know if there is an older and an updated version.I think the 850 was released, as a model, after the head units design changes were implemented also, so in theory at least, all 850 units should be the newer design.
I just ask for clarification to OASE and they said that some initial filters come with an issue, but all are now solved/replaced.Ah ok, that is good! I v asked the shop for clarifications and they returned back to me with no answer. They dont even know if there is an older and an updated version.
I have also sent an email to oase and they said that the 850 version doesn't have any updates. Theoretically it is updated since it is the last model in product line.I just ask for clarification to OASE and they said that some initial filters come with an issue, but all are now solved/replaced.
I hope so, should be possible return the filter in case we don't like it, or make a "test drive" first... 🙂I have also sent an email to oase and they said that the 850 version doesn't have any updates. Theoretically it is updated since it is the last model in product line.
So I guess it's fine to proceed on the purchase.