• You are viewing the forum as a Guest, please login (you can use your Facebook, Twitter, Google or Microsoft account to login) or register using this link: Log in or Sign Up

Water meadow gardening

Hi all,
I remember visiting wetlands in Mallorca where they grow absolutely huge, like 4m+, and how satisfying it was to walk through clearings of them
I've seen big ones locally, and it isn't warm here. I might be tempted to cut the old canes down in the spring.
Potentialla palustris, added to the list of plants to grow both in pond margin and garden :thumbup:.Thelypteris palustris, a fern as a marginal plant.
I've got these, the Thelyptris actually came all the way from Marcel in the Netherlands, after my plant expired in the drought (while I was away from home).

Ranunculus lingua and R. flammula (Greater and Lesser Spearwort) are also good value (and native). You <"can see them"> (and Eriophorum latifolium, Osmunda regalis, Eleocharis palustris, Iris pseudacorus, Myosotis scorpioides, Mentha aquatica, Hippurus vulgaris, Galium palustre, Mimulus "guttatus" & Lysimachia nummularia) in the pond and margins.

The pond dried out completely in 2018, but some plants survived, Hypericum tetrapterum, Stellaria palustris, M. guttatus, Onoclea sensibilis, Juncus ensifolius, L. nummularia, M. aquatica, P. palustris, Carex remota, C. pseudocyperus and probably a few more .

cheers Darrel
 
What an epic project this is going to be. Looking forward to all the updates that will come and the end result.

Good to hear that other people can't help being drawn to streams, lakes, rivers, a ditch with water in etc just out of curiosity to see what life exists in there. Thought I was the only one😆
 
Good to hear that other people can't help being drawn to streams, lakes, rivers, a ditch with water in etc just out of curiosity to see what life exists in there. Thought I was the only one😆

I don't know about everyone else, but it was specifically this that got me into the hobby. My first aquarium was bought for goldfish-from-the-fair, but I brought home many, many jars before that- first I wanted to raise tadpoles, then I became fascinated by all the things that would emerge into the water of a jar with a layer of mud at the bottom.

I am really envious of this project, "life goals" as they say!

I think it's going to look stunning when done!. Imagine when this is complete sitting outside on a nice day right next to it, relaxing would be an understatement.

I definitely agree with you from where it all starts, there was a park very near where I grew up that had a stream running right through it, very shallow. Used to always fine stickle back in there, even found a small perch in there once. That's how it all started for me, then I discovered rock pools which fascinated the life out of me!. Then when I was older and I discovered takashi amano my brain when it to complete overdrive.
 
Let me write a bit about the construction of the ponds.

In terms of the pond size, instead of going for one or two huge ponds, I went for a multitude of smaller sized ones, offering more space for gardening with marginal planting at the edges. I planned the maximum width of the ponds so that at the widest points, the space in the middle is still just about accessible with a net or a rake or whatever.

In terms of depth, about one third/half of each pond is 80cm deep, with shelves at 50cm and the upper shelf between 20-35cm. I am still not sure what depths of baskets to work with for my marginals so I left upper shelf a little bit deeper than normal, so I can use deeper containers in the future if I choose to. If I decide on shallower containers, I will just have to use bricks to raise them to the right level.

One of the biggest criteria for the visual success of ponds for me is the edging; how well the pond liner can be hidden, both when viewed from the side, along the waterline (so how level is the edge of the pond) as well when as viewed from above; how 'thick' is the edge of the pond and how can it be camouflaged.

While I have seen some excellent examples of pond edges hidden by rocks, achieving a natural looking finish using this method requires a lot of skill and the right placing of the right materials (eg sourcing matching rocks in a range of sizes, including very large pieces and repetition in and around the margins of the ponds, if not further into the garden, not just literally placed around the edge). I read somewhere that peoples' tastes for their gardens is heavily influenced subconsciously by what they have witnessed in the natural environment around them. Maybe that explains why so many people choose stones and rocks (apart from practical reasons) to hide the edges because it reminds them of scenes in nature they have enjoyed with boulders or rock formations exposed along streams. To me, more often than not this method does not end up looking convincing but that could just be down to taste of what someone experiences as 'looking natural'.

My inspiration comes more from places where the water is still, like pools found in marshes or fens or the margins of ditches where reeds and marginal plants blend land and water. Rocks and stones do not really feature much in those places, so I want to find a different way of hiding the liner.

I have chosen the raised pond edge method, using strips of flexible edging attached to stakes. The edging is attached in such a way that it sticks out 5cm above the stakes. The big advantage of this method is that the liner can then be folded over a very thin edge and tucked away into the soil of the garden. I think this method is more popular in Holland and Germany than it is over here. I could source rolls of recycled plastic edging (14cm high, 7mm thick) marketed as lawn/ border edging in the UK. The same material is sold as pond edging in Europe. I used 60cm stakes produced by the same company (Ecolat) but needed to get these shipped from France as over here they only sold shorter stakes (for border edging).


20200711_120516.jpg


The idea is that when digging the pond, you don't dig all the way to the intended edge. After its dug, you then drive the stakes along the intended edge, attach the edging and then dig straight down along the inside of the edging down to the depth of the first planting shelf in the pond. We used a laser level to drive the stakes into the ground down to the right level. No easy feat with clay soil and when stakes are 60cm long and there are 160 of them! On the other hand, clay soil works very well with this method of pond digging as it holds the sides well and no further re-enforcement is needed. Having said that, the edges of the holes, after some expose to the sun, did begin to dry out, crack and crumble away and needed to be protected with sheets of plastic when we were not working on them. When digging one pond, this would not have been such an issue but when there are five ponds to be finished off at once after the initial work of the digger, the longer went by, the more challenging this became. I spent many hours watering the sides of the holes most evenings during the hot summer in a drawn out battle to prevent the sides from drying out and collapsing.

In hindsight, I should have got more out of the digger. I was lucky that the operator came with his own laser level. I had not thought through this process enough and achieving the same water level across most of the site required some skills, which fortunately came with the digger but it could have easily gone wrong if I had engaged the wrong person. I regret not having the digger work an extra day after doing the ponds. I did get him to do some landscaping on the last day but a digger can achieve in 30 minutes what can take a person a whole day. What at the time, I thought were 'finishing touches' which could be done by hand turned out to be weeks' of work! For example, the operator of the digger was skilled enough to make straight cuts where I wanted yet at the time, I thought I would play it safe and not let the digger come too close to the intended levels, in case he went too far. As a result, there was still a lot of work left before the ponds are ready for the liner. In the picture below, you can see the clay around the pond cracking up. We used sheets of plastic to try to reduce them drying out.

20200717_194351 (2).jpg


In places where the existing level was low or where the sides underneath the edging had crumbled away too much, we needed to apply some strips of plywood to support the edging. After the edging, we applied a layer of sand, protective fabric and finally the liner. We started with the smaller ponds, building up our experience before tackling the larger ponds at either end of the garden.

The first pond we dug was the fourth one from the house (3.5 m3):
20200718_123230.jpg
20200718_125620.jpg
20200718_150522.jpg


It was incredibly satisfying to see the first pond filled with water.
20200719_183753.jpg


The second pond from the house was next (2 m3) and then the middle pond (5 m3):
20200719_183854.jpg
20200719_134150 (1).jpg
20200729_124347 (1).jpg


The pond at the back was the largest and took a few more weeks prepare. On the final day, I needed to bring in a few extra people to help move the liner. The tap was on all day long filling this one (12m3):
20200803_143656.jpg
20200803_152529.jpg
20200803_163501 (1).jpg


The final pond was most challenging. As part of the dig, we had to remove some of the foundation of the patio, so this needed to be rebuilt. Also, I changed my mind a few times about the layout of the shelves so these had to be reconstructed also. Next year I will put decking onto the patio, so hopefully create a bit of a 'house on the waterfront' effect (7 m3):
20200823_122950 (1).jpg
20200823_133858(0).jpg
20200825_095514.jpg


These pics were taken two days after filling the final pond.
20200825_100058.jpg


20200825_100406.jpg


To give an idea of how long this all took from when the digger started work, it took three weeks before we could fill the first pond and then a further five weeks before the last pond was filled. The edges will be tucked away as the garden or paths next to the ponds are worked on. In my next post, I will share a bit more about those few weeks of the ponds settling in and some of the challenges encountered.
 

Attachments

  • 20200717_194351 (1).jpg
    20200717_194351 (1).jpg
    2.5 MB · Views: 207
  • 20200719_121534.jpg
    20200719_121534.jpg
    2.2 MB · Views: 204
  • 20200719_114436.jpg
    20200719_114436.jpg
    2.4 MB · Views: 206
Last edited:
Have to say its an absolute joy reading through your progress and getting to see this from the very start, all the time and effort you are putting in is going to be hugely worth it!. You are going to have one amazing garden when this is all complete. Definitely agree with @dw1305 about a visit.
 
Much of this project is about the margins. Plants which can grow in boggy conditions but will also thrive in clay soil. Plants that can live with their roots in and out of the water. Aquatic plants that can both live submerged or emersed. Garden - Pond - Aquarium. I find it quite exciting to to find out about plants which straddle these 'genres' and think there is scope for the horticultural/ aquatic word to bring these closer together. How designs under water could link in with the margins and even the wider garden. How marginal planting inside the pond can literally connect with the plants in the 'border'. Information out there can become aimed at one target group of hobbyist, as can the plants themselves be also. So its great to hear from Mort that regal fern (known as a garden plant) and Marsilea hirsuta (known as an aquarium plant) can both be grown as a marginal pond plants. Also I find it really interesting to see which aquarium plants can be grown all year round in the pond in the UK.

So I am really pleased with the feedback I am receiving here. Amazing knowledge is already building up (for me anyway). In such a short space of time, my list of "plants suitable for both pond margin and garden" has doubled and this blog is becoming a valuable way of pulling together information. At first, I was not sure where to blog (pond forum/ garden forum?) but I am glad to have stuck with UKAPS so many thanks for your encouragement but especially for sharing your experiences;


I can confirm lynchis flos cuculi and hesperantha coccinea are good marginals as Darrel said. I've had both for years and the hesperantha has done very well in deed propagating itself including several revisions back to the original colour. I also see ragged Robin all over the broads in the margins.
A smaller plant that's nice in the spring and good in the margins or pond edge is sisyrychium californicum, the similar purple species does ok as well ime but isn't as happy.
Geum rivale is also good in the margins or on the bank as is caltha paulustris.

One plant that will do well in the margins or on the bank and one I'll always have is Osmunda regalis, the royal fern. I've always loved that plant especially when combined with delmera peltata (but that's more exotic).

Regal fern is fine in direct sun as well ime if it has moist feet


And yes, also Bog Fern grows well in the full sun as long as it gets water. Well, it's a bog fern, it will creep its rhizome out of the water and grow on land too. What's still in the water will also feed what's on land as long as the rhizome aint cut. It grows rampant in the full sun. No problems.


Ranunculus lingua and R. flammula (Greater and Lesser Spearwort) are also good value (and native). You <"can see them"> (and Eriophorum latifolium, Osmunda regalis, Eleocharis palustris, Iris pseudacorus, Myosotis scorpioides, Mentha aquatica, Hippurus vulgaris, Galium palustre, Mimulus "guttatus" & Lysimachia nummularia) in the pond and margins.

The pond dried out completely in 2018, but some plants survived, Hypericum tetrapterum, Stellaria palustris, M. guttatus, Onoclea sensibilis, Juncus ensifolius, L. nummularia, M. aquatica, P. palustris, Carex remota, C. pseudocyperus and probably a few more .


Myositis pallustris can fill up any gaps and grows in damp soil as well as with wet roots. I have grown marsilea hirsuta from my tank in the swamp of my pond and it has survived there for several years now, including some frost.
Stachys palustris and mentha aquatica also love both it in the swamp and soil around the pond, fitting your colour scheme and easy growing. They can turn thuggish though, have to keep them in check :) bees love them.
 
Last edited:
I'm from what nowadays is called Park City, i live in Heerlen - South Limburg. As a kid, we have a number of local ponds within walking distance... :) As youngest of 6 siblings, they took me fishing from a very young age, actually as long as i remember. My most favourite spot was an old abandoned castle ruin a stone throw away from my home. It had a ditch fed with water from about a 1-acre marshland, lush and green. For a small kid that is a massive area with the feeling, you could get lost in there. I always went there with a bucket and a net searching all the pools and puddles for aquatic wildlife. Leeches, beetles, spiders, sticklebacks, salamanders, name it could be caught there and I took it home to study in my aquarium in the garden. And I'm hooked ever since. :)
Good to hear that other people can't help being drawn to streams, lakes, rivers, a ditch with water in etc just out of curiosity to see what life exists in there. Thought I was the only one😆
I don't know about everyone else, but it was specifically this that got me into the hobby. My first aquarium was bought for goldfish-from-the-fair, but I brought home many, many jars before that- first I wanted to raise tadpoles, then I became fascinated by all the things that would emerge into the water of a jar with a layer of mud at the bottom.

I am really envious of this project, "life goals" as they say!

Great to connect with like minded people and know I am not the only one obsessed then. It can feel that way sometimes :thumbup:🇳🇱

It is absolutely fantastic in scope and vision. I want to sign myself up for a visit in 2022? Right here, right now.
You are going to have one amazing garden when this is all complete. Definitely agree with @dw1305 about a visit.

Wow, thank you both for the vote of confidence. I really hope I can pull it off and would love to host your visit.
 
Some other small marginal plants you might like to look into...

Bog pimpernel, my old-time favourite, it loves to grow on wet clay at the margins. It's a very small creeper and likes to trail over rocks into the water with small reddish/purple flowers. It can grow quite bushy and cover quite some area if planted in rich soil. But it's also a delicate plant, if not planted in the correct spot it might not survive the winter it's an absolute sun worshiper. I don't know for the rest of Europe but the wild form in the Netherlands and Belgium is on the red list and hard to find in nature.

Mazus reptans, a tad bigger and lovely mainly purple lip flowers with a white heart with yellow dots. Also wants sunny spots that stay rather wet. I'm not sure about its soil preference, it originates from the Himalaya growing near mountain streams. It might also grow lithophytic near streams in the splash zone among the mosses.

Creeping Jenny of course again a tad bigger, as the name says it's a prolific creeper with nice yellow flowers.

To feather some pond edges the Myriophyllum aquaticum red stem, goes in the trade often as M. brasilliensis.
It stays a lot smaller than the true M. aquaticum, it doesn't come out of the water but will grow dense nice coloured floating maths and stays in the shallows. I gave a bit last year to my neighbour who has a larger pond and it really took off and looked really nice. It's actually a tropical, but it easily survives mild frost.
 
Bog pimpernel, my old-time favourite, it loves to grow on wet clay at the margins. It's a very small creeper and likes to trail over rocks into the water with small reddish/purple flowers. It can grow quite bushy and cover quite some area if planted in rich soil. But it's also a delicate plant, if not planted in the correct spot it might not survive the winter it's an absolute sun worshiper. I don't know for the rest of Europe but the wild form in the Netherlands and Belgium is on the red list and hard to find in nature.

Mazus reptans, a tad bigger and lovely mainly purple lip flowers with a white heart with yellow dots. Also wants sunny spots that stay rather wet. I'm not sure about its soil preference, it originates from the Himalaya growing near mountain streams. It might also grow lithophytic near streams in the splash zone among the mosses.
These both look great Marcel, two more to add to the list of plants suited to either side of the pondliner. I can see why you like Bog pimpernel so much. Definitely going to try that! I am also on the lookout for different plants to use to hide the edges of marginal baskets which stick above the waterline and these both would probably do great. As would Creeping Jenny, thank you.

Myriophyllum red stem also looks interesting:thumbup: Thanks again.
 
Last edited:
One plant that is normally grown as a pond plant but is equally at home in a garden border is Equisetum japonicum, the Horsetail. I used to grow this in a previous garden where it grew quite happily amongst restios and did not look out of place. It did not even need watering.
 
Let me write a bit about the construction of the ponds.

In terms of the pond size, instead of going for one or two huge ponds, I went for a multitude of smaller sized ones, offering more space for gardening with marginal planting at the edges. I planned the maximum width of the ponds so that at the widest points, the space in the middle is still just about accessible with a net or a rake or whatever.

In terms of depth, about one third/half of each pond is 80cm deep, with shelves at 50cm and the upper shelf between 20-35cm. I am still not sure what depths of baskets to work with for my marginals so I left upper shelf a little bit deeper than normal, so I can use deeper containers in the future if I choose to. If I decide on shallower containers, I will just have to use bricks to raise them to the right level.

One of the biggest criteria for the visual success of ponds for me is the edging; how well the pond liner can be hidden, both when viewed from the side, along the waterline (so how level is the edge of the pond) as well when as viewed from above; how 'thick' is the edge of the pond and how can it be camouflaged.

While I have seen some excellent examples of pond edges hidden by rocks, achieving a natural looking finish using this method requires a lot of skill and the right placing of the right materials (eg sourcing matching rocks in a range of sizes, including very large pieces and repetition in and around the margins of the ponds, if not further into the garden, not just literally placed around the edge). I read somewhere that peoples' tastes for their gardens is heavily influenced subconsciously by what they have witnessed in the natural environment around them. Maybe that explains why so many people choose stones and rocks (apart from practical reasons) to hide the edges because it reminds them of scenes in nature they have enjoyed with boulders or rock formations exposed along streams. To me, more often than not this method does not end up looking convincing but that could just be down to taste of what someone experiences as 'looking natural'.

My inspiration comes more from places where the water is still, like pools found in marshes or fens or the margins of ditches where reeds and marginal plants blend land and water. Rocks and stones do not really feature much in those places, so I want to find a different way of hiding the liner.

I have chosen the raised pond edge method, using strips of flexible edging attached to stakes. The edging is attached in such a way that it sticks out 5cm above the stakes. The big advantage of this method is that the liner can then be folded over a very thin edge and tucked away into the soil of the garden. I think this method is more popular in Holland and Germany than it is over here. I could source rolls of recycled plastic edging (14cm high, 7mm thick) marketed as lawn/ border edging in the UK. The same material is sold as pond edging in Europe. I used 60cm stakes produced by the same company (Ecolat) but needed to get these shipped from France as over here they only sold shorter stakes (for border edging).


View attachment 154771

The idea is that when digging the pond, you don't dig all the way to the intended edge. After its dug, you then drive the stakes along the intended edge, attach the edging and then dig straight down along the inside of the edging down to the depth of the first planting shelf in the pond. We used a laser level to drive the stakes into the ground down to the right level. No easy feat with clay soil and when stakes are 60cm long and there are 160 of them! On the other hand, clay soil works very well with this method of pond digging as it holds the sides well and no further re-enforcement is needed. Having said that, the edges of the holes, after some expose to the sun, did begin to dry out, crack and crumble away and needed to be protected with sheets of plastic when we were not working on them. When digging one pond, this would not have been such an issue but when there are five ponds to be finished off at once after the initial work of the digger, the longer went by, the more challenging this became. I spent many hours watering the sides of the holes most evenings during the hot summer in a drawn out battle to prevent the sides from drying out and collapsing.

In hindsight, I should have got more out of the digger. I was lucky that the operator came with his own laser level. I had not thought through this process enough and achieving the same water level across most of the site required some skills, which fortunately came with the digger but it could have easily gone wrong if I had engaged the wrong person. I regret not having the digger work an extra day after doing the ponds. I did get him to do some landscaping on the last day but a digger can achieve in 30 minutes what can take a person a whole day. What at the time, I thought were 'finishing touches' which could be done by hand turned out to be weeks' of work! For example, the operator of the digger was skilled enough to make straight cuts where I wanted yet at the time, I thought I would play it safe and not let the digger come too close to the intended levels, in case he went too far. As a result, there was still a lot of work left before the ponds are ready for the liner.

View attachment 154773

In places where the existing level was low or where the sides underneath the edging had crumbled away too much, we needed to apply some strips of plywood to support the edging. After the edging, we applied a layer of sand, protective fabric and finally the liner. We started with the smaller ponds, building up our experience before tackling the larger ponds at either end of the garden.

The first pond we dug was the fourth one from the house (3.5 m3):
View attachment 154774 View attachment 154775 View attachment 154776

It was incredibly satisfying to see the first pond filled with water.
View attachment 154786


The second pond from the house was next (2 m3) and then the middle pond (5 m3):
View attachment 154787 View attachment 154783 View attachment 154784


The pond at the back was the largest and took a few more weeks prepare. On the final day, I needed to bring in a few extra people to help move the liner. The tap was on all day long filling this one (12m3):
View attachment 154788 View attachment 154789 View attachment 154790


The final pond was most challenging. As part of the dig, we had to remove some of the foundation of the patio, so this needed to be rebuilt. Also, I changed my mind a few times about the layout of the shelves so these had to be reconstructed also. Next year I will put decking onto the patio, so hopefully create a bit of a 'house on the waterfront' effect (7 m3):
View attachment 154791 View attachment 154792 View attachment 154793


These pics were taken two days after filling the final pond.
View attachment 154794

View attachment 154795

To give an idea of how long this all took from when the digger started work, it took three weeks before we could fill the first pond and then a further five weeks before the last pond was filled. The edges will be tucked away as the garden or paths next to the ponds are worked on. In my next post, I will share a bit more about those few weeks of the ponds settling in and some of the challenges encountered.

Looks great. What are you doing/have you done re filtration - or are you just letting the ponds look after themselves in that regard via the plants?
 
What are you doing/have you done re filtration - or are you just letting the ponds look after themselves in that regard via the plants?
I am not planning on using any filtration. The plan is very much lots of plants in there from day one, hopefully with a good enough ratio between deeper water (80cm) and shallower shelves with marginal plants and, above all, a low bio load of fish. Definitely no gold fish, or other fish which disturb the plants. The fish going in there will be tiny in comparison. On top of that regular maintenance and being prepared to empty and clean out the ponds every few years.
 
One plant that is normally grown as a pond plant but is equally at home in a garden border is Equisetum japonicum, the Horsetail. I used to grow this in a previous garden where it grew quite happily amongst restios and did not look out of place. It did not even need watering.
Really, Equisetum japonicum in the garden? I did not know that:thumbup: Fantastic, I will definitely add that to the pond&garden list. Thank you for sharing the experience. Do you happen to know it Equisetum is happy with its crown below water? I have read different accounts and if you say it grows well in the garden also, might that suggest it prefers its crown out of water, I wonder? A visually amazing plant which could really add to the concept and help create a 'boggy' feel to the rest of the garden. Does it behave as a garden plant?

Also, I wonder whether Equisetum hyemale can be grown the same way (in pond and in garden) as I already have some of these.
 
Last edited:
Hi all,
Equisetum hyemale can be grown the same way (in pond and in garden) as I already have some of these,
I would be very wary of any of these bigger Equisetum spp.

I had Equisetum fluviatile, and once it gets going it is almost impossible to control, the rhizomes go very deep and can penetrate through Water-Lily rhizomes etc. and any fragments grow. Because it has a relatively frail stem I thought it would be easier to control than E. hymale, but it didn't work quite like that.

cheers Darrel
 
I would be very wary of any of these bigger Equisetum spp.

I had Equisetum fluviatile, and once it gets going it is almost impossible to control, the rhizomes go very deep and can penetrate through Water-Lily rhizomes etc. and any fragments grow. Because it has a relatively frail stem I thought it would be easier to control than E. hymale, but it didn't work quite like that.
Thanks Darrel, that's really good to know. Stick to Equisetum japonicum then.
 
Equisetums can be planted with the crown underwater but in shallow water, about 6 - 10cm. I have one in a half-barrel in a pond basket. It is surviving but does appear to be too deep .

Looking up E hyemale, this plant seems to need a wet soil but does not need to be submerged. It is recommended for containers to control its spread.
 
Thanks MWood! Great to hear about your experiences re Heteranthera zosterifolia. I read that H. zosterifolia can take it down to 5C . Have you overwintered it and how do you grow it in your pond? Is it submerged and in in what substrate does it grow?

Trying out some some 'aquarium plants' in the pond is definitely part of the plan! I already grow vallisneria gigantea in tubs all year round which will benefit from the extra sun they will receive in the pond. Keen to intoduce sagittaria subulata and other types of vallis also. Also plan to grow different Potamogeton species.

The fish I am keeping are white cloud minnows, roundtail paradisefish (Macropodus occelatus) and a few killifish (Fundulus julisia, F. catenatus and Aphanius mentho). I will continue to keep breeding groups in tubs for most of them as well as introducing some to the ponds and will be writing about this later on.

I have overwintered it for the past 3 or so years, though I do admit that my garden is pretty sheltered and in London, I've chanced my arm with a lot of tender plants with some success (and some failure), mostly because of laziness. It did make it through the cold in 2018 though. It's in a basket with Darmera peltata, about 15/20 cm or so under the surface, in some Velda pond soil capped with gravel. However it often escapes and floats freely, or sinks and roots into whatever. In your setup I imagine it would be quite a sight! I've also got some Rotala, Hygrophila and Crypt wendtii in similar conditions out there, so we shall see... Potamogeton gayi also did well this summer come to think of it.

Great fish, A. mento very much on my list - do you have any problems with the rain making the water less hard than I understand they like?

Here's one of my tubs - a half whiskey barrel - in rather poor shape in comparison to a month or so ago but you get the idea. Probably should do something about all the duckweed.

Looking forward to hearing about further progress.


IMG_8251.JPG

IMG_8248.JPG
 
At the start of the journal, I mentioned that I am following (more or less) the pond keeping principles of Ada Hofman who is known in Holland for advocating the use of oxygenating plants instead of filters in order to achieve clear pond water. I will post more another time but one of her basic principles is that enough plants must go in within 24 hours of the pond filling up.

Using lots of oxygenating plants to help keep algae at bay is of course something lots of us do already in our aquariums. When setting up a tank I try to pack it with plants from the outset, especially fast growing ones which can always be removed once the slower growing plants have taken off. With my ponds, I really wanted to try to do the same. With the ponds sited in full sun and set up during the height of summer, I felt it was even more important to get as many plants in there as possible from the outset. The challenge of course is the huge amount of plants that would be required. I could not really afford to buy the quantity needed of those small bunches of oxygenators in order to achieve the same effect. To get around this challenge, I had made contact with the owner of a fishery whose lake was filled with hornwort. I was told I could come and help him ‘weed’ the lake and take however much I needed, which was great and solved that problem.

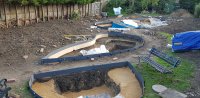
The pond build took so much longer than expected and by the time I tried to make contact again with the fishery, I could not get hold of the person I spoke to. With the clay sides of the ponds crumbling away under the hot sun, I needed to get them lined and filled asap and could not wait for my free pond plants to become available. At first, I was amazed at the staggering amount of spare hornwort, Elodea and Vallisneria I was pulling out of my little mini pond and the tubs on my patio. Incredibly, I would say it was enough to stock the first two smaller ponds we had completed.

20200719_121617a.jpg


By the time the middle pond was nearing completion, I had still not heard back from my contact at the fishery so I ordered 200 bunches of milfoil online to tie me over in the meantime. The milfoil arrived a few days later but in a sorry state, possibly the parcel had been out in the heat for too long. Most of the bottom part of the stems had melted. Normally I would have sent them back but desperate for more plants to go in straight away (especially in the full summer sun), I removed the soggy stems and planted the tops which still felt solid. All I could do was thin out the plants from the first two ponds and share among all three, along with the new baskets of milfoil. As about a week and a bit went by, the water started turning green:

20200801_125450 (1).jpg
20200729_124411.jpg
20200804_171103.jpg


By now, I was not feeling good. The project was costing me so much more time and money than anticipated. The sides of the holes for the large ponds were crumbling away and the ponds that had filled up were turning green and the water was getting darker by the day. There was no going back yet I began to question whether I actually had the knowledge needed to take this on. I double checked her books and green water was definitely not part of the ‘Ada Hofman’ plan. At least not the type of green water I was experiencing in the middle pond – dark green with lots of bubbles;

Middle pond, 6 August

20200806_151419 (1).jpg


All I could read in Ada’s books was that if you follow the correct steps, you should not get green water. Not the pea soup type. If you do, and if it does not go away, then her only advice is to empty and start all over again! Now I was in desperate mode. It was the start of August and the sun was shining hard on the water. Probably the worst possible time of the year to be at this stage of my project. My Dad and uncle in Holland both have ponds and each sent me over a packed box of oxygenating plants. Still I needed more as the back pond was not far from completion and this one was bigger than the other three combined. I tried buying daphnia but all the stores locally had sold out. I ordered some online but with the heat there was practically nothing left of them when they arrived. The milfoil I had planted had almost completely melted away.

20200805_13105aa9.jpg
Inked20200723_0923a17_LI.jpg
20200806_111929.jpg


By now I had started going out on my bike and with my net, searching for ponds or waterways with oxygenators and/or daphnia. I felt I needed large amounts, of both or either, in order to save the day. For the first few trips I did not have much luck. Then I struck gold.

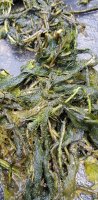
Outside some houses I spotted a pond totally and utterly choked with Elodea and I was allowed to take what I wanted. I made a few trips back and forth and in total collected 6 bin bags full. All ponds received a generous helping and by the time the large pond at the back was being filled, I was chucking in armfuls of the stuff.
20200805_153458 (1).jpg
20200804_185035 (1).jpg


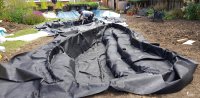
In the meantime, my replacement daphnia had arrived, alongside shade netting I had ordered. With large poles and lots of string, we made a construction so that each pond could be shaded out with the 50% shade cloths for at least part of the day.

20200803_163501aa.jpg


One morning I woke up and decided I was just going to empty the middle pond and fill her up again but this time with plenty of oxygenators. When I looked into the water it seemed like I could see down a bit more than before. I was not 100% sure so I waited to see if there might be an improvement. The next day, yes, definitely an improvement. By day three, I could see the first shelf again. My confidence was restored.

From here things were looking up. My contact at the fishery got in touch and invited me round one evening and told me I could help myself to whatever I wanted. Apart from hornwort, this beautiful lake was also packed with Water soldier which the owner was also keen for me to take. I did restrain myself but still packed a solid bag. Having already filled the ponds with Elodea, I only took a modest amount of hornwort in the end. Just to be safe, as these plants came from a fishery, I disinfected them all before adding to the ponds.

20200819_192708 (1).jpg
20200819_185243 (1).jpg


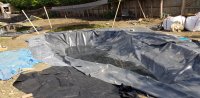
So the final two ponds had plants and netting from the very start (start and mid-August). At first I just chucked in all the plants and then spent what time I could planting up pond baskets with Elodea, anywhere from 5 to15 in one evening. Also, by this time, I had daphnia blooms in my other ponds so could seed the new ponds with generous amounts of daphnia at regular intervals (not knowing at what stage they would actually take hold in a new pond). The water in both these larger ponds remained crystal clear. Then about 4 weeks after they were filled, a green film appeared over the water with bubble ‘spit’, gradually thickening into a floating, slimy layer.

20200916_105244a.jpg


At first, I was concerned that this could happen despite the many plants and netting in place from the start. When I looked into it further, I read that it was to do with protein bacteria or something but definitely not algae. I skimmed off what I could with a net, which made a difference for a day or so but the it came back. After a few more days, however, it just disappeared and everything was clear again.

Although not a pretty sight, I will leave the netting in place (rolled up over winter) until late spring next year, to give the oxygenators a head start over the algae. Hopefully after that, with marginal planting and pond lilies more established and casting shade of their own, the netting will not be needed any more.

Having built a few ponds in succession, it is so interesting to observe the phases they go through. First the mosquito larvae infestation (I was scooping net loads out the size of tennis balls, can you imagine if I let them hatch?) - definitely the favourite stage of the fish in my tubs. Then the green water. And then, crystal clear water with a second windfall (daphnia) for my tub fish.

I know there is a lot more hard work ahead but after months of toil and stress, now that the ponds were finally planted and clear, at last, the garden was starting to give me back some moments of pleasure. Actually, of sheer excitement.

Middle pond, 8 September


Attachments

  • 20200812_093252 (1).jpg
    20200812_093252 (1).jpg
    857.3 KB · Views: 191
  • 20200719_183801 (2).jpg
    20200719_183801 (2).jpg
    1.5 MB · Views: 189
  • 20200804_171053 (1).jpg
    20200804_171053 (1).jpg
    1.9 MB · Views: 192
  • 20200801_125450 (1).jpg
    20200801_125450 (1).jpg
    2.2 MB · Views: 181
  • 20200804_171149 (1).jpg
    20200804_171149 (1).jpg
    1.8 MB · Views: 198
  • 20200803_155031.jpg
    20200803_155031.jpg
    2.1 MB · Views: 179
  • 20200916_105244.jpg
    20200916_105244.jpg
    1.4 MB · Views: 182
  • 20200803_163501.jpg
    20200803_163501.jpg
    2 MB · Views: 193
  • 20200803_163501.jpg
    20200803_163501.jpg
    2 MB · Views: 185
  • 20200805_131059.jpg
    20200805_131059.jpg
    988.9 KB · Views: 183
  • 20200723_0923a17.jpg
    20200723_0923a17.jpg
    1 MB · Views: 185
Last edited:
Back
Top