• You are viewing the forum as a Guest, please login (you can use your Facebook, Twitter, Google or Microsoft account to login) or register using this link: Log in or Sign Up

The road to Pont-Y-Pair - A 4 foot journey

bbtom10

New Member
Joined
14 Oct 2024
Messages
22
Location
United Kingdom
Hi all, see my introduction thread for more about me.

Following our extension and refurbishment of our lounge we had a space against the wall which I thought would be perfect for a 4 foot tank. 2 years into the hobby and decided it was time to go for a big one.

My plan was to buy a 120cm Aquamarin Planta 1200 from Maidenhead Aquatics (£639) because I like the open top design and the simple cabinet. I already have the Oase Biomaster Thermo 250 and bought a AllPondSolutions 2000L/H + 9W UV Aquarium External Filter EFX+ for £99 to run as a second filter.

My son and I have been admiring IAPLC designs for a while now - wonder why MD and others don't try and undertake these style of aquascapes but thought let's give it a go. Our inspiration was Bebei Zhang's 2021 entry which ranked 10th.

#405: 360L Aquatic Garden “Vitality” - see attachments.

No idea why I can't find the IAPLC version but this is the scape.

I was also inspired by frequent trips to Wales, Betws-y-coed, Eryri national park etc. So I wanted to use slate and create a diorama style scape.

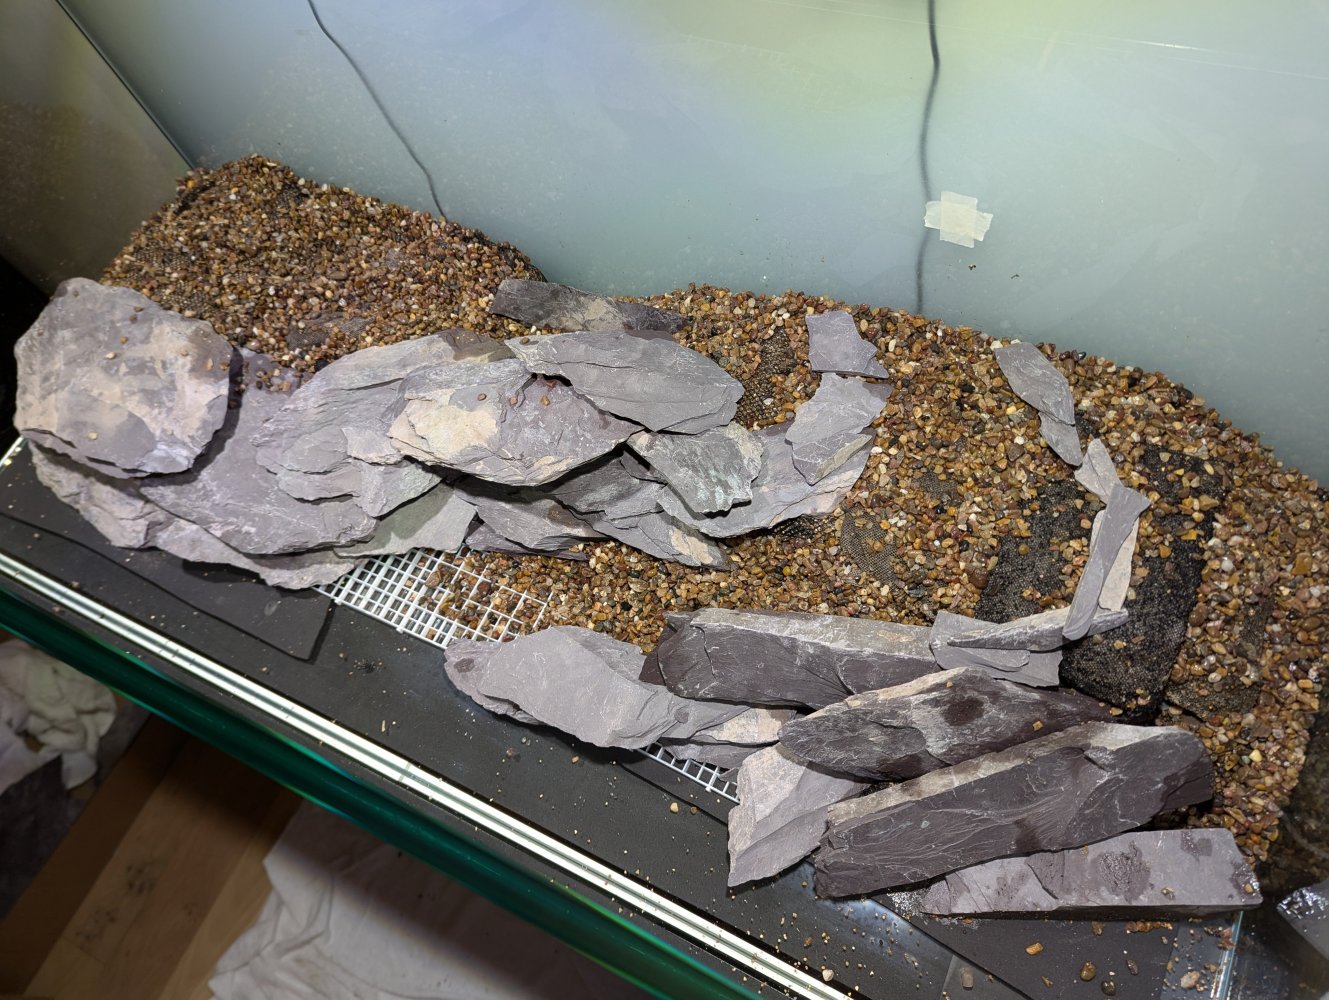
I've built up a collection of hardscape bits over the last couple of years, but I decided to go buy 4 pieces of large blue slate - £20 from the local garden centre. Got them home and broke them up into a few large chunks (and plenty of scatter gravel!). I was also keen to use lots of wood. I have various bits of mopani wood from 'The Range', and a few other bits and pieces. I also found a local 'live edge' wood seller who also had a load of bits of driftwood for sale, £3 each! So went and bought a few of those from him.

In total, I've probably spend about £100 in hardscape.

The next job was to plan and prepare. We had 2-3 weeks to wait (my son and I) until the tank arrived, so plenty of time to build ourselves a cardboard dojo and have a play!
 

Attachments

  • 4050.jpg
    4050.jpg
    102.2 KB · Views: 172
  • PXL_20241030_205625694~2.jpg
    PXL_20241030_205625694~2.jpg
    1.4 MB · Views: 98
  • PXL_20241019_195529740.jpg
    PXL_20241019_195529740.jpg
    1.4 MB · Views: 72
  • PXL_20241024_212412868.jpg
    PXL_20241024_212412868.jpg
    1.7 MB · Views: 72
So, i turns out that Seabray, who make Aquamarin tanks, are a 2-man operation, which means when their lorry breaks down everything grinds to a halt.

Cue a lot of preparation time, looking at and collecting plants, playing with the dojo and generally convincing my wife that yes, she will get her dining room back soon, while I waited for the call from Maidenhead Aquatics to say it had finally arrived for collection.

That day came Friday 8th November (thanks Helen), along with a very kind voucher for fish as a result of the inconvenience. 5 weeks we had waited.

My son and I went and picked it up, along with a bag of pond compost and a few other bits and pieces. I was surprised to learn that contrary to what I was told, the cabinet wasn't flat packed, and so it took us a bit of figuring out to ensure it could fit into my Skoda Superb (I've yet to find something that car can't swallow whole!).

And lo, it was in place. And it was good.
 

Attachments

  • PXL_20241109_115613456.jpg
    PXL_20241109_115613456.jpg
    1.2 MB · Views: 84
One last note about the equipment before I get onto the scaping, planting, and other good stuff (possibly not today!) - lighting. I was previously using a superfish light on my 100cm tank and it was great, but I wanted something with more impact. This was supposed to be a highlight of the lounge, a visual piece of art, and so I wanted to go back to my roots and have some spotlights.

I reverted to MD and saw he had used some Lominie Asa 120 lights (kessel knock-offs). I couldn't find them anywhere so ended up ordering two from AliExpress. Given the time I was waiting for the tank I thought I could wait. They arrived after 2 weeks and I was really impressed. You can see them set up above the dojo so we could see how the light worked with the developing scape.

So:

Aquamarin Planta 1200 - £639
2 x Lominie Asta 120 - £150
AllPondSolutions 2000 EF+ - £99
FZone CO2, 2.5L - £99

Total - £987

Plus I already had the Oase Biomaster Thermo 250 from eBay for my original tank - £100.

Reflecting on it, probably could've gone for a Fluval Siena for a couple hundred more, but the additional depth and lid just weren't what I was after.
 
Substrate System

First things first, creating the outline three dimensional space and the nutrient layer.

As a now seasoned aquascaper, I have a few buckets of previous gravel and bits and pieces which I stuffed into bags and used to create the raised points at back left and back right. The plan was to create a plateau on the right (mirroring the original inspiration because I wanted the more open side to be on the window side of the lounge) and a lower plateau on the left for planting my big stem section.

Once I'd got the rough shape we decided to get some rocks in - mostly to create the support for the layers, and I was also keen to get the shape for the path up to the vanishing point into position as soon as possible (the right hand side back). You may notice I marked the vanishing point with some masking tape - I did forget to remove that for the first fill!

The idea with the slate was for the left side to be a wall - a cliff face if you will, We wanted to create caves and gaps which would allow for shrimp or cory's to feel safe in and maybe breed in at some point. The right hand side is supposed to be a little more of a distant cliff edge hillside, trying to create that sense of perspective and depth, so these stones are smaller and more numerous. My son really wanted to create a cave in the centre so we managed to find a nice way of doing that.

We were happy with the stones and so finished the substrate system - this was a layer (one whole bag) of Nutri-base (Colombo), and a pretty heavy helping of pond compost. I am a little concerned I used too much but time will tell. I then scattered a load of initisticks from Tetra all over, including on the front foreground where there isn't much soil or nutribase. Finally a big thick layer of play sand - we tried to cover about 3-4cm at the back and the front tapers right down to the front edge. So our tank is ready to sustain life, and give us our initial structure...
 

Attachments

  • PXL_20241109_115626262.jpg
    PXL_20241109_115626262.jpg
    708.9 KB · Views: 49
  • PXL_20241109_125733832.jpg
    PXL_20241109_125733832.jpg
    1.5 MB · Views: 40
  • PXL_20241109_123150784.jpg
    PXL_20241109_123150784.jpg
    1.2 MB · Views: 40
  • PXL_20241109_122122482.jpg
    PXL_20241109_122122482.jpg
    1.5 MB · Views: 40
  • PXL_20241109_123157405.jpg
    PXL_20241109_123157405.jpg
    2.5 MB · Views: 42
  • PXL_20241109_125740579.jpg
    PXL_20241109_125740579.jpg
    2.1 MB · Views: 52
Hardscape

Finally, after 5 weeks of waiting, and more in planning and thinking, it was time to get the hardscape into the tank.

The previous post I covered the slate and how that went in - we will add some more now the sand is in place, but first we need to wrangle some wood!

My son and I have been having a few disagreements about how to go about this, so we essentially decided to trust each other - I set up the left side, he set up the right. Remember that the left is the cliff face, the looming darkness towering above you. I really wanted this to be a dark area for planting bucephelandra and some anubias, for fish to shelter in from the light and hide whilst hopefully still being in full view. Behind this is where most of the stems and valisneria will be planted to that will grow above it in time and, perhaps, create a distant view of fields and forest. The right side is the path to Pont-Y-Pair (which is just a bridge in Betws-y-coed, one of my favourite places in the world, a small welsh village - there is not actually a beach or cliff there, but ther are paths and waterfalls and sandy edges to the river, so that was my inspiration for this scape overall). The path to Pont-Y-Pair was my son's challenge - we wanted driftwood (rosewood and some old bits of collected wood from the local area which have been in numerous previous scapes - don't throw anything away folks!) leant up against the front and then a shift to smaller and smaller sticks to really get the sense of depth as you 'walk up the hill towards the vanishing point'.

Once I had my initial attempt set up, and he his, we stood back and took a few minutes. He had nailed it. I wasn't quite sure about my side. You will see there is in one photo a really big flat chunk with a kind of 45 degree bend - I'm calling it the 'trolls finger'. It was a favourite piece for the dojo but wasn't quite working here. I'd spent £3 on that piece of wood from a 'live-edge' wood shop, so I was reluctant to lose such an expensive investment 😉 but, as I then went on to explain to my son, sometimes you have to kill your children (or so the saying goes). We tore the left side down and had another go. The other large piece of wood we had was one I found whilst walking with my nephews in the forest. I had jet washed it, soaked each end in bleach, left to dry and hoped it would be ok. We had to cut it into 1/3 2/3 pieces when playing in the dojo but it went in really well. I was always keen to keep a few 'peep holes' through to the back and I think it worked out great.

So, cost update:

Substrate:

Nutribase - £15
Pond compost - £6
Gravel - 'Alpine grit' - £5.99
Play sand - £5.99

Hardscape:

4 pieces blue slate - £20
Various bits of mopani wood & rosewood from 'The Range' - £60
Drift wood from the 'live edge' man in Shrewsbury - £20

Total: £132.98.

Total so far: £1119.98
 

Attachments

  • PXL_20241110_132743006.jpg
    PXL_20241110_132743006.jpg
    1.5 MB · Views: 83
  • PXL_20241109_185750506.jpg
    PXL_20241109_185750506.jpg
    1.9 MB · Views: 60
  • PXL_20241109_192233889.jpg
    PXL_20241109_192233889.jpg
    2.1 MB · Views: 66
Day 2 - Planting

So after we finished the hardscape we filled the tank with cold tap water, just to get everything water logged and ensure it was all glued down - I really had my doubts but my son was quite insistent he had glued everything on his side, and I was pretty sure I had glued everything my side - and we had! Nothing floated which given how much hardscape there is, was a minor miracle!

I also forgot to mention I also had a pack of Rio Xingu Dennerle scatter gravel, which along with the alpine grit made some excellent detailed textures around the edges.

Sunday we went off in the morning to get 100L of 'spotless water', with thanks to @Maf 2500 for the tip. We also got some decorative sand because I wanted something a bit lighter for the final layer.

Then we got home, drained the tank down and got to work.

My main plants were the 1-2 grow in-vitro style plants. £100.30 later:

Dennerle Bucephalandra Kedagang Plant-It
Tropica Echinodorus Reni 1-2-GROW
Dennerle Rotala wallichii Plant-It
Dennerle Rotala macrandra Plant-It
Aquadip Cryptocoryne Flamingo In-Vitro
Tropica Juncus repens 1-2-GROW
Dennerle Bucephalandra Micrantha Needle Leaf Plant-It
Dennerle Lilaeopsis brasiliensis Plant-It
Dennerle Bucephalandra pygmea Bukit Kalem Plant-It
Tropica Rotala macrandra 1-2-GROW
Dennerle Anubias barteri nana Plant-It
Tropica Cryptocoryne wendtii 'Mi Oya' 1-2-GROW
Tropica Hydrocotyle tripartita (Japan) 1-2-GROW
Tropica Cryptocoryne wendtii Green 1-2-GROW
Tropica Helanthium tenellum Green 1-2-GROW
Dennerle Staurogyne repens Plant-It
Tropica Phyllanthus fluitans 1-2-GROW

I knew I wanted lots of buce and crypts, and also that wild grassy look for the edges of the beach areas, to really tie in the edges of the rocks with the beach and scatter gravels.

We set about cleaning the gel off the epiphytes and again took a side each and started glueing to the wood - the 'buce hole', the large dark area on the left really came together quite well, and a few bits of java fern and bolbitis set it off nicely, albeit the 'bunches' of java fern I'd picked up from my LFS were essentially 5 leaves with a hint of rhizome, so we will see if they grow and spread or not!

I had a few other plants I'd picked up over the last few weeks, some crypt wendtii green, albeda brown, and my old tank had some good valisneria and limnophelia in which will help establish the tank quite quickly. Couple of bunches of macaranda and two tiger lotus bulbs finished the back area off well. Along the path we mixed up the juncus repens and the lilaeopsis brasiliensis and I am hoping it will give that 'sand dune' vibe which again sends me back to static caravan holidays in Barmouth in my youth.

In the end I didn't plant the two pots of in-vitro macaranda, but will add those if the bunches of macaranda don't take - I've not had much luck with them in the past, but I'm hoping with CO2 and 60% RO water, as well as regular fertilisers we might get them going. I'm sure there are a few other plants I had lying around which I haven't mentioned here, do call me out on them as this journal progresses.

And so, Sunday evening, we filled the tank with our 100L of RO water, about 75L of rain water, and the rest with hot water from the tap. We used hot water so the temperature was high enough that we could add the filter, the allpondsolutions 2000 ef+, which had been running for nearly 5 weeks on my old tank, and then add a handful of fish.

In went a bristlenose pleco, 2 CPDs, an old white phantom tetra I've inherited and an otocinclus. Some of the older bits of wood have old dried algae, and I will feed the tank a little as well. I also added a handful of pink ramshorn snails and 4 nerite snails.

And I sat back and marvelled at what we had created.
 

Attachments

  • PXL_20241110_190236534.jpg
    PXL_20241110_190236534.jpg
    1.9 MB · Views: 107
Day 4 - first water change

After 4 days it’s time for the first water change (aside from the fill and empty after the first fill up). I have a nice tank of tea!

My water change set up is to symphony into a bucket, and have a small pump with a hose to pump the water out of the bucket and onto the front garden. This allows me to get out some of the pond soil which has come through the sand and a few bits of rubbish. I don’t plan to be a meticulous cleaner, quite happy to build up some malm and what have you, but while in there and while the tank is getting established, seems like removing anything which could add ammonia or other nasties probably should come out for now.

I took out about 50% and replaced with about 70% RO and 30 hot water from the tap. My TDS was about 250 after the water change, so still a little hard, but much better than tap alone. Really hoping this allows the plants to really take hold.

As mentioned previously, the APS EF+ 2000 filter has been running for a few weeks, so I added my 5 albino cherry barbs to the 5 fish I put in on Sunday. Water parameters show nitrates, nitrites and ammonia are low, but not 0, so my cycle is underway and my filter doing it’s job.

I’m finding CO2 dosage is a little tricky… by the end of the day my drop checker is getting yellow (though it’s hard to tell with tannins in the water!), so just lowering a little. Fish all seem happy though, no gasping.

Day 6 will be 120L close down and full stock transfer to this tank, along with the Oase biomaster thermo 250. Stay tuned.

Oh, you’ll also note that my lights are not balanced… the left light has a blue channel reflection on the wall which is annoying. I’m hoping the AliExpress shop can help me address this.
 

Attachments

  • PXL_20241113_191304348_Original.jpeg
    PXL_20241113_191304348_Original.jpeg
    2 MB · Views: 47
  • PXL_20241113_191258757_Original.jpeg
    PXL_20241113_191258757_Original.jpeg
    3 MB · Views: 41
  • PXL_20241113_191315023_Original.jpeg
    PXL_20241113_191315023_Original.jpeg
    2.7 MB · Views: 41
  • PXL_20241113_183013803_Original.jpeg
    PXL_20241113_183013803_Original.jpeg
    3.3 MB · Views: 47
  • PXL_20241113_211853378_Original.jpeg
    PXL_20241113_211853378_Original.jpeg
    3.7 MB · Views: 49
Day 6 - Stocking filler

I had a day's annual leave on Friday (need to use up my entitlement before end Dec so a few extra Friday's in the offing!) so decided that would be the best date to close down the 120L 100cm tank (see my 'hello' entry for pics of that tank). As previously stated, the plan was to run both the APS 2000 EFX+ filter and the Oase Biomaster Thermo 250 on this tank. I did put a heater in behind the left corner because I don't think the Thermo 250 heater will be enough for 288 litres, but I'm sure the two filters combined will have enough filtration.

Meant to say earlier I did pimp out the APS 2000 EFX+ with some better bio-media (can't find the link now, but similar to the 'pimp my filter' guy, but not the same).

So, Friday, plan is to catch the fish out of the 100cm tank, take off the filter, put the fish in the 4ft and add the filter, as well as adding an inline CO2 feed while I'm messing with the pipework. Then close down and clean out the 100cm, storing the old media in bags in the garden. Just in case! Also to pull out any remaining plants and box them up for either planting into the 4ft, or for when my son redoes his Superfish Scaper 90 at christmas. I've found using chinese takeaway plastic boxes with a cm of water and placing the lids on, then leaving them in the sunlight works well enough for a few weeks to keep the plants alive and well. I gave them a squirt of fert just to be sure.

As I caught the fish I acclimatised them one litre jug at a time and got them into the new tank - I was very pleased with how they all found their homes and territory quite quickly - the cories found the caves and the black neons were schooling up and down in no time. The emperor tetra tend to be a bit more casual - shoaling rather than schooling.

I attached the new stainless steel inlet and outlet pipes and looked at adding the inline CO2 but, alas, it seemed to small for the pipes so I've had to send it back and I'll shop for another. Not entirely sure I'll have the patience to try again now all the pipework is in place and the CO2 diffuser in the tank is in it's nice spot, but perhaps as I get tired of fortnightly bleaching the CO2 diffuser I'll try again.

The old tank cabinet, which cost me £50 (tank and cabinet), a 2nd hand Jewel Rio, which I had painted up, was finally retired to the dump. The tank itself is now in the garden collecting rainwater - one day I'm going to set it up as a second 'cold water' tank in my garden cabin (aka the shed), but that needs emptying and shoring up now it's nearly ten years old. The corners getting damp and the floor will need better support, so after I've redone the kitchen in the spring, the shed will be my summer task.

Anyway, I've drifted from the point - the tank is full of livestock and looking awesome, if a little cloudy. Next update will be the shiniest picture yet!
 

Attachments

  • PXL_20241115_195826053.jpg
    PXL_20241115_195826053.jpg
    1.3 MB · Views: 34
  • PXL_20241115_220259248.jpg
    PXL_20241115_220259248.jpg
    1.7 MB · Views: 48
  • PXL_20241115_220257569.jpg
    PXL_20241115_220257569.jpg
    1.7 MB · Views: 39
Day 7 & 8 - Angels & Gin

With my son home from university it was time for another trip to the local fish shop - my dream was to have a group of angel fish in the tank along with the other tetras and such, and so we went to find a small group of angels. While we were out I also picked up to houseplants in B&Qs Black Friday sale (£20 each). These are going either side of the tank to help it blend in a little more. My wife was away for the weekend so I also had to ensure the photos were all back on the wall (pics from our trip to Iceland last year), as I had to take some down as the lights were in front of them and it didn't pass the PAF (Partner Approval Factor).

We acclimated them into the tank and they went in and I'm really pleased with the group of 8 (c. £50).

Sunday I did another 50% water change - thi
s time I had an old aquarium heater sitting in the large 25L water carrier to heat it up, that way I can avoid having to use any tap water and try and keep the TDS below 200. Once it's below 200 I will start adding some tap water again, but keen to get it soft so the plants grow better.

Once we were topped up again I thought we were finally approaching the end game for the scape and water - no tannins, well cycled filters, good stock level and a very exciting tank to watch.

I also spent a good hour or so on the chat with AliExpress complaining about the balance of the lights - they are investigating but in the meantime I've spent £16 on 2 wifi controllers to add to them, which should allow me to look more closely at the blue channel and try and get them aligned.

So, now it's the turn of the plants to grow - we have some new growth on the hydrocotle tripartita, and I think the juncus repens is starting to get going - annoyingly something has eaten all the leaves from my cheap macaranda stems, but hopefully the 1-2 grow macaranda I've now added at the back will establish and be less tasty - I wonder if it was just because they were cheap bunched stems and hadn't established themselves?

So here you go - clear and looking like the fantastic addition to my lounge I was hoping, and all this in just over a week!
 

Attachments

  • PXL_20241117_160909858.jpg
    PXL_20241117_160909858.jpg
    1.6 MB · Views: 55
  • PXL_20241117_160930347.jpg
    PXL_20241117_160930347.jpg
    2 MB · Views: 46
  • PXL_20241117_180254439.jpg
    PXL_20241117_180254439.jpg
    1.7 MB · Views: 50
  • PXL_20241117_180303427.jpg
    PXL_20241117_180303427.jpg
    1.7 MB · Views: 53
Great journal, really enjoying the journey and the tank is looking fab.
this time I had an old aquarium heater sitting in the large 25L water carrier to heat it up, that way I can avoid having to use any tap water
Didn't quite understand this bit, do you have your own RO unit?
that way I can avoid having to use any tap water and try and keep the TDS below 200.
Going down the tap water route you could feasibly reduce the percentage down to 80/20, 85/15 or even 90/10 just adding a couple of teaspoons of Magnesium Sulphate (Epsom salts), alternatively with the use of pure RO, two possibly three simple salts and a £15/20 set of scales you can take control of the GH, KH and TDS to within reason.
 
Didn't quite understand this bit, do you have your own RO unit?
No, I have 4 x 25L water containers which I either fill from Spotless Water's dispensary units, or, now we've had some rain, from the water butt.
I'm a bit nervous about the potential to make a mistake with the chemical engineering, so will probably stick to adding a bit of tap water when the TDS drops below 100 - seems easy enough to manage, albeit the parameters might swing around a bit then? Not sure who would get upset by that (fish, snails, shrimp or plants)?
 
Day 18 - let battle commence

The community is looking happy and the plants are starting to get a foothold in the tank now, unfortunately so is some algae.

I was expecting there to be some algae problems early in the tanks life. I’ll admit I was really hoping my approach of using old substrate and cycled filters and weekly water changes 50% would mean algae stays at bay, but it looks like some of the old plants I moved across to this tank have carried some black hair algae which is starting to blossom.

My light is coming on for 9 hours at 40%. CO2 was coming on and off at the same time because I only had one WiFi switch but I’ll update on that in a moment. I’ve been dosing fertilisers every other day, 14-16ml each time of a basic mixed fertiliser from Amazon. You’ll note I’m not on a budget, but where I can save a penny or two I will.

So my first thought when I did the 50% water change yesterday was to trim off the leaves which were most heavily affected (see photos). I also trimmed up the stem plants in the back. Really impressed with the limnophelia Myrophillum (I think I might’ve made that up), it’s growing faster than the limnophelia sessiliphora! The macaranda seems to have established itself and no more leafless stems so think it will survive. I’ve trimmed it all back and replanted to try and create a bushier look but looking forward to when it is visible from the front, reaching up the back of the aquarium. The red tiger lotus is also blooming very well. Again invisible down the back there but hoping the leaves are visible soon enough.

I managed to mess up the FZone CO2 when I first set it up. Decided I’d add 50% more ingredients and water. Whole thing nearly exploded as I wrestled with screwing the lid on! And now, it seems to have run out already. Now I’ve cleaned it out I realise most of the dry ingredients are all clumped and crystallised together, so obviously I just need to follow the instructions, which I’ve done now.

Also some good news on the lights. You’ll recall the colour doesn’t match between the left and right side of the Lominie Asta 120s. I was in touch with the guy from AliExpress and he was very helpful over the course of 3 weeks of communication. I received the WiFi controllers this week (another £8 each) and whilst I can tweak the colours much better, they’re still not matching. So the guy said today he will send me a replacement. Will have to decide then which one is the problem!

I’m going to keep the light low and drop to 8 hrs at 40%, with the first and last half hour at 20%, hopefully the algae doesn’t keep growing and cutting off the leaves which are most infected does the trick.

Thanks for reading, until next time, here’s some pics to enjoy…
 

Attachments

  • PXL_20241124_181311006_Original.jpeg
    PXL_20241124_181311006_Original.jpeg
    3.7 MB · Views: 21
  • PXL_20241122_165053076_Original.jpeg
    PXL_20241122_165053076_Original.jpeg
    2.8 MB · Views: 18
  • PXL_20241122_164810317_Original.jpeg
    PXL_20241122_164810317_Original.jpeg
    2.1 MB · Views: 18
  • PXL_20241122_165107367_Original.jpeg
    PXL_20241122_165107367_Original.jpeg
    3.3 MB · Views: 16
  • PXL_20241122_164823576_Original.jpeg
    PXL_20241122_164823576_Original.jpeg
    1.2 MB · Views: 17
  • PXL_20241122_165132867_Original.jpeg
    PXL_20241122_165132867_Original.jpeg
    2.5 MB · Views: 16
  • PXL_20241124_181318256_Original.jpeg
    PXL_20241124_181318256_Original.jpeg
    4 MB · Views: 17
  • PXL_20241124_181329561_Original.jpeg
    PXL_20241124_181329561_Original.jpeg
    3.4 MB · Views: 13
  • PXL_20241122_165059705_Original.jpeg
    PXL_20241122_165059705_Original.jpeg
    3.5 MB · Views: 14
  • PXL_20241124_181303104_Original.jpeg
    PXL_20241124_181303104_Original.jpeg
    3.2 MB · Views: 13
  • PXL_20241122_164831219_Original.jpeg
    PXL_20241122_164831219_Original.jpeg
    2.7 MB · Views: 15
  • PXL_20241122_165042417_Original.jpeg
    PXL_20241122_165042417_Original.jpeg
    2.2 MB · Views: 13
  • PXL_20241122_165204189_Original.jpeg
    PXL_20241122_165204189_Original.jpeg
    2.5 MB · Views: 12
  • PXL_20241122_165222290_Original.jpeg
    PXL_20241122_165222290_Original.jpeg
    2.7 MB · Views: 22
I’m going to keep the light low and drop to 8 hrs at 40%,
It might help but then again dropping the intensity will not do the fast growing plants and surface plants any favours and weakened plants are algae magnets. I think your CO2 levels are too low - I aim for at least 20 ppm and I have a citric and bicarb system, for my 2 foot tank, it only lasts at most a fortnight. For a tank your size and with the plants etc., I'd go for a fire extinguisher, a 2 kg will I think fit in the cabinet if there is no shelf - but you will need a decent regulator. I use a 5 kg extinguisher on my four foot and get the best part of 10 months out of a tank, worth every penny.
 
macaranda
The magic of good CO2, good light and lean dosing illustrated from my overgrown jungle Mad Hatter's tank, which yes has some green algae. I know, really in need of good prune and replant of cuttings to get somewhere back to something like the original layout - layout for me is a generous term, a bit of bogwood and tall plants at the back, shorter to the front!
 

Attachments

  • 20241128_205914.jpg
    20241128_205914.jpg
    1.2 MB · Views: 23
The magic of good CO2, good light and lean dosing illustrated from my overgrown jungle Mad Hatter's tank, which yes has some green algae. I know, really in need of good prune and replant of cuttings to get somewhere back to something like the original layout - layout for me is a generous term, a bit of bogwood and tall plants at the back, shorter to the front!
Ok, supercharging!
 
Back
Top