• You are viewing the forum as a Guest, please login (you can use your Facebook, Twitter, Google or Microsoft account to login) or register using this link: Log in or Sign Up

DIY Project DIY ADA Style Aquarium Stand

No the frame is made out of 70mmx70mm square timber mm being millimetres? The stand is obviously 80x60cm. I didn't want to trust in mdf and my dodgy diy so there is a very sturdy frame at the heart of it. Similar style to alistairs last chocolate tank.

Sent from my GT-I9505 using Tapatalk
 
I think he means 70mm timber used for a 80x60cm cabinet ;)

Edit: d'oh! Ya beat me to it
 
*She* James :) lol

Ah you'll be fine then Lindy, 70 x 70 would build a boat lol
 
Whoops! Sorry Lindy. I thought it was Deano3.......
 
I would have liked to put wheels on it as its going to be a heavyweight beast but that would sky rocket the price.

Sent from my GT-I9505 using Tapatalk
 
I would have liked to put wheels on it as its going to be a heavyweight

Even with wheels on I wouldn't fancy moving a large'ish fish tank around full of water lol, swish, swish, ooops, where's my fish (gone)! lol :)
 
I meant just for moving the stand lol. We are hoping to move this year so this will all have to be shifted :eek:

Sent from my GT-I9505 using Tapatalk
 
I thought it was men that always say ''my wife doesn't understand me'' :rolleyes:

Mine doesn't. Especially when it comes to a 180cm 300l tank :)
 
Finished sanding off the edges tonight so applied some watered down white emulsion as a primer. Seemed to take ok. Guess I'll do this a time or two before sanding off and thinking about undercoat.

Not quite sure what undercoat to use, probably try some normal wood stuff see how that takes :)

WG7s714.jpg
 

Attachments

  • WG7s714.jpg
    WG7s714.jpg
    127.6 KB · Views: 127
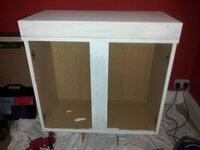
Also thought as quite a resorceful thread I'll add some extra photos...

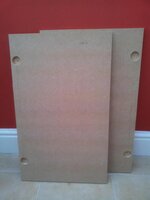
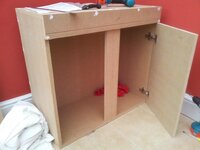
Drilling the holes to fit hinges to the doors, after looking all over for the measurement to drill these and finding a blum tech sheet, i drilled my 35mm holes (with a forstner bit) 22.5mm centre from the edge of the door panel, 4 inches down from top/up from bottom. Got to be quite careful as the holes needed to be about 14mm deep (in 18mm door) and with a small pilot bit on the forstner drill bit, it almost came through the front of the door, this will depend on the drill bit you use.

doorholes_zps43186041.jpg

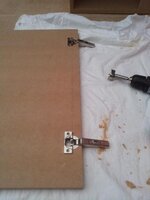
I then fitted the hinges to the doors.

fittinghinges_zpsf8a9f411.jpg

After screwing the hinges into the door I fixed on the mounting plates (that screw onto the cabinet sides) and put all hinges in closed position.

readytohang_zpsc5041277.jpg

To get the correct position for the mounting brackets was simply a case of propping the door in it's closed position against the cabinet, using screwdrivers, scrapers, bascially anything I could to pack it out into the position it would be in when closed. Once happy with all gaps at the side, top etc, I drew around the mounting plates on the cabinet sides with a pencil, then removed the mounting brackets from the rest of the hinge, put them inside my pencil marks and marked the centres for the mounting bracket screws. I believe you can get a blum mounting template that does all this for you. *Note - doing it the way I did, i got a good fit, but did have to use all the hinge adjustment available to get the doors flush to the top panel so in hindsight I should have set the mounting bracket 2mm back from my where my marks were, but hey, it's worked out ok.

onedoorfitted_zps94485ac4.jpg

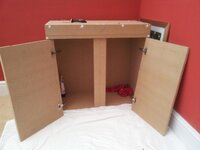
I then offered up the left hand door whilst the right hand door was still on, to ensure gaps between the doors were good, once lined up and the left door gently packed and held in position (as the right one was) i removed the right hand door so i could get in to draw a pencil round the brackets for the left door. I then just did the same for this door as the other (so again had to use all adjustment for getting doors flush!), and when all done...

doorshung_zpsace5c517.jpg

Da-daaaaaaaaaaaa :)

Cheers,
Rob
 

Attachments

  • doorholes_zps43186041.jpg
    doorholes_zps43186041.jpg
    43.2 KB · Views: 134
  • fittinghinges_zpsf8a9f411.jpg
    fittinghinges_zpsf8a9f411.jpg
    59.2 KB · Views: 208
  • readytohang_zpsc5041277.jpg
    readytohang_zpsc5041277.jpg
    46.4 KB · Views: 883
  • onedoorfitted_zps94485ac4.jpg
    onedoorfitted_zps94485ac4.jpg
    52.4 KB · Views: 141
  • doorshung_zpsace5c517.jpg
    doorshung_zpsace5c517.jpg
    49.7 KB · Views: 145
You've not got the piston clipped on

Exsqueeze me? lol. The only things missing are the shiny cover caps (and these won't be clipped on until position is final), these are blumotion softclose things (it's all built into the mech). You can see a little black switch on the door side of the hinge that switches the soft close on or off ;)
 
Back
Top