Todays update should be titled "I hate painting"...
I believe some people enjoy this, find it therapeutic, maybe even do this for a living. How? Why? I love DIY, but christ painting is the worst 🥲
As mentioned above the tank had been varnished on the inside so I had to try and get a good key to it. I'm using really high quality primer so I got out a bit of 40-grit and a sanding block and went to town. I think I did an okay job, not amazing, after 1 coat you could easily see the areas which were better keyed than other parts. The second coat covered really well and I've been waiting a good few hours for it to dry before I crack the gloss out. I'm going to try and get one layer of gloss done tonight before I go to sleep, so I can wake up, do another one and hopefully get things in place by the afternoon.
Before:

In progress:


Whilst that's been drying I've been doing a little more wiring. First things first I printed out a small enclosure
I found on Thingiverse and mounted it in the frame using 3M VHB tape. For those who don't know, VHB is a foamy double sided tape which is, for all intents and purposes, permanent. To remove things normally you'd have to get some thin wire to dental floss to cut through the foam and then roll the sticky part off. It's perfect for tasks like this where you need a strong mount but don't have access to screws.

The pins on the ESP32 board are Dupont connectors, so I grabbed a few female connectors are wired up the Vin, GND and both Pin 4 and 2 of the board. Pin 4 is our data pin for the LEDs and pin 2 is being used as a remote switch, going to the switch on the front of the cabinet, which then returns to GND. The wire I am using is 22 gauge silicone wire which is too thick for the dupont connector bodies, which makes it a right pain in the backside to crimp and insert, but I got there eventually.

I think clipped it all together into the housing and started to cable manage. For some perverted reason this is always my favourite thing of any electronics project. It can take a functional job into an aesthetically pleasing piece of work, in addition it often makes troubleshooting down the line so much easier, so the extra half hour effort is completely worth it in my opinion.


Here you can see the red and black being the obvious positive and negative power lines, for both the ESP32 and the cabinet lighting. These are wired to the rear of the case and into the Meanwell PSU. To the top there are two blues and a white wire. The blues go to the front power switch which I mentioned above. The white is the LED data lead. There are also two free red/black wires which will be the LED wires, which will be wired direct to the PSU. This means the LED's do not need to pull current through the ESP32, rather they take it directly from the 5v power supply.
I wasn't sure how I wanted to get the wires through the base of the cabinet into the main body to then sent to the backlight panel. To make life easy I decided to use some 3 pin JST-XH connectors. These are both very secure, compact and polarised and therefore, in theory, will prevent me letting the magic smoke out.

To make the passthrough nice and neat it of course meant a trip to Fusion 360 again to design a plug. Again, this is just a 16mm rod with a flange on one end, but this time with a 10.25mm x 7mm rectangle through the centre to let the JST-XH connector sit in, which in turn will be held in with a blob of hot glue.

14 minutes, 26 seconds later and...

This was then installed in a 16mm hole I drilled, and the wires cable managed. The paint was slightly chipped but it's going to be out of sight so I'm not worried.


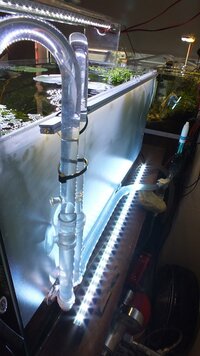
Next to tackle was the LED cabinet lighting. I've decided to make my life easy and, rather than daisy chain all of the LED strip segments in series, I will just wire them in parallel. They are actually all in parallel on the strip itself, so it's just a different way of wiring to achieve the same thing. This makes it really easy to just pop some Wago-style terminal blocks somewhere convenient (I choose the bottom of the ferts tube) and stick them down with more VHB tape. I can then run the LED driver power cable, this time just a simple +5v/GND, into each terminal block, and send out the LED strips from there.

To make life easy too, I've also decided to combine both the LED power supply 230v input and the extension plug (which will only be used for water changes) on to the same plug that goes up to the extension lead. For this I will just use more terminal blocks, as these are rated to 32A/250v they're perfect for simplifying things. I should probably cover all this up as it's mains voltage, but I can't see any water getting to that part of the cabinet and I don't intend to stick my hands in there for no reason with it live.

Unfortunately I'm an idiot and the backbox for the plug extension is jammed in the hole, I think it's just the paint that's decided to moonlight as an adhesive. Not sure how I'm going to get it out but I might need to go to Screwfix and get a new one if this needs cut out.


")