• You are viewing the forum as a Guest, please login (you can use your Facebook, Twitter, Google or Microsoft account to login) or register using this link: Log in or Sign Up

Finally my Aquascaping Journey Begins :)

To secure the wood and the hard scape, I used a hot melt glue gun to attach rocks to the bottom of the wood to act as anchors. I also added substrate supports to help keep the shape of my valley. Fingers crossed that this holds :)
image.jpg
 
Next was preparing and adding of the hydrocotyle tripartita before filling in the carpet area with glossostigma elatinoides. Finally I added the background plants, Rotala Rotundifolia, with a feature area of Rotala Wallichii on one side...
image.jpg
 
image.jpg
Finally I flooded the tank and my first aqua scape was born :happy: and I was very pleased with myself, until the following day when all of my rotala rotundifolia were floating on the top:grumpy:. Not to worry though, as I replanted the following day, and this time it stuck..
 

Attachments

  • image.jpg
    image.jpg
    223.1 KB · Views: 113
And this was my aquascape a week into running. The Anubias is pearling like mad, the hydrocotyle has stood up and I can see its developing its root structure, the glosso has already started to send a lot of runners out, and both types of rotala have anchored themselves a bit better and are already showing signs of growth. One thing to add though, I did realise whilst planting that I had under ordered on some of the plants. The anubias in particular, and due to the Xmas break, I wasn't able to get more delivered, so in the next few days I'll be placing an order with aquarium gardens for some more Anubias sp mini, and also a few more pots of glosso and hydrocotyle, to fill the empty space on the left hand side, and also to further add to the planting density of the other areas. ;)
image.jpg
image.jpg
image.jpg
 
image.jpg

By the way, apologies for the photo quality. I haven't at the moment, attempted to take any refined photos, but merely taken progress photos on my iPhone. I'll be leaving the attempt to take some fancy ones until the scape has grown in and is established. I'll attempt to get one more good one of the whole scape today when I am home, and after I have done my first water change and cleaned up some of the Amazonia dust off of the tank walls and Anubias leaves.
 
I've had to reduce the photo period as I started to see the first signs of algae developing on the glass. I have reduced from 8 to a 5 hour photo period for now,and I'm experimenting with slowly increasing the co2. You can't see from colour of the drop checker in the pic I just uploaded, because I manually switched the lights on only 5 minutes after the co2 had switched on this morning in order to take the pic, but it is at current levels,a nice deep green at lights on, and lime green by the time lights switch off. I have Co2 on 2 hours before lights on, and co2 off 1 hour before lights off. I Have some liquid carbon on order as well and have got myself a window blind to put up, as the small specs of algae that I saw in the first stage of development were only on the side of the glass where the sun shines on the tank from the window. Hoping these together will nip it in the bud before it becomes a problem. Anyone else got any good suggestions for this?
 
Oh and I have changed the filter as well since I originally started this. Before I set everything up, I got rid of the scapers flow filter , and replaced it with an eheim Ecco pro 200. I'm still using the Lilly pipe and inlet tube from the scapers flow though, as the Ecco pro plumbs straight up to them, no problems, and they are unobtrusive in the tank.Currently the set up is as follows:

  1. Eheim Ecco pro 200
  2. Hydor 200 watt inline heater
  3. Co2 art professional dual stage regulator (latest one with improved gauges and Swiss solenoid with built in needle valve).
  4. Up Aqua inline atomiser from Co2 art on the filter inlet tube (co2 on the pipe from the aquarium,into the filter)
  5. Ei dosing with aquarium plant foods ei dosing beginners kit.
 
Thought I'd do a 'quick' update. My scape has been planted and running now for 4 weeks,and I'm really pleased with the growth I have had :) 
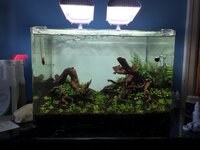
unfortunately,due to losing my grandma just after Xmas, yesterday's water change and maintenance was actually the first, I'm ashamed to say. The ei dosing went a little off track as well and as a result, the early signs of green and brown algae I mentioned in a previous post, ended up being quite extensive, so I had to spend about 8 hours yesterday on the cleaning and trimming when I did the water change. Although after the big clean and trim, I'm pleased with the scapes progress, I have already decided that some of my plant choices haven't fully achieved my initial vision for the tank, so I'll be making these changes shortly. The glossostigma has taken off great, but I'll be taking it all out in the next couple of weeks and replacing it with hemianthus callitrichoides 'Cuba'. The reason for this being,that I think the glosso's leaves are too large and are detracting from the sense of scale and depth I wanted to achieve with the scape,and it has also grown less compact than I had envisioned, thereby not giving the look of a sloped valley like I wanted. It also looks almost the exact same colour as the neighbouring hydrocotyl tripartita,which I think further erodes the sense of scale. I'm hoping that the Cuba will achieve this better, with its smaller leaves, and more compact growth, and hopefully adhere more to the profile of my substrate and highlight the undulations of my substrate banking. I'm also hoping that more of the spindly detail of my redmoor root will be visible as well. I'll be finally adding more Anubis sp mini, but to some larger rocks(fully covering them) to the empty areas of substrate to the left (Where the arched bit of wood is) to give the impression of the valley slope being more pronounced. I'll also be adding more of the same to the right hand piece of wood, to further add to the look of it 'spilling over' the wood from behind. I've already removed the rotala wallichii I had growing behind the right hand piece of wood, as although it was growing well, and had coloured up, it was smothering the growth of the rotala rotundifolia growing behind. I put this down to the fact that I added an established potted plant, so it was always taller than the tissue culture rotundifolia right from the start. I also planted it a little too densely as well. I'm planning on filling the space behind the right piece of wood with only a light planting of rotala wallichii, and also a bush of alternanthera reineckii rosanervig, or something similar. Anyway, here are some pictures I took tonight
image.jpg
image.jpg
Any thoughts welcome :)
 
Last edited:
Back
Top