Hi RyanH,
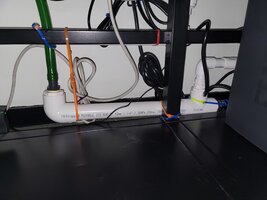
For my answers I'll be referencing the picture I uploaded on November 5, 2020. First there are three valves that I will reference during my response:
1) Inlet Valve: Top Right of Picture
2) Maintenance Valve: Bottom Center of Picture
3) Outlet Valve: To the left of the Maintenance Valve in Picture
4) Tank Valve: Not pictured. It is behind the canister that does not have the black wall behind it. This is technically your outlet valve, but for simplicity I am not going to name it that. This valve is only used when you clean the media in the three center canisters (Stages 2-4)
Answers:
1. Assuming a start from scratch, I need to prime it manually similar to the Eheim Classic Canister filters. In short, assuming there is no water in the system, create suction to draw the water into the system from the tank and let gravity do the rest. The way I do this is as follows:
a. Close the Outlet Valve. Open the Inlet Valve and Maintenance Valves.
b. Hook up a hose to the Maintenance Valve and keep it open.
c. Start sucking on the end of the Maintenance Valve Hose to create pressure. Gravity will take over and fill the first Sponge filter with water (takes about 10 seconds) and then the water will begin to flow out of the Maintenance Valve hose.
d. Once water flows out of the Maintenance Valve hose (hopefully into a bucket) you are primed. Close the Maintenance Valve. At this point Maintenance and Outlet are closed, and Inlet is open. Water is standing still but the system is primed.
e. Open the Outlet Valve and turn the pump on at the same time. This assumes your Tank Valve is already open as well (it will stay open 99% of the time).
This probably sounds harder when I type it out, but remember it is all gravity. The pump will prime itself if you create suction to draw the water in from above. One thing to note is that the system can become self-priming once you get is started.
For example, if you want to change the sponges in the first stage:
a. Close the Inlet & Outlet Valves. Hook up a hose to the Maintenance Valve and open it.
b. Unscrew the sponge filter canister, empty the water and clean the sponges. This will also cause any water between the Outlet Valve and Inlet Valve to drain out the Maintenance Valve (i.e. if left and right are turned off, everything needs to drain down the middle).
c. Hook the canister back up and open the inlet valve - remember gravity. By turning the inlet valve off when the system was primed all the water pressure remains. When you turn it on gravity will kick in and refill the system.
d. The Canister and pump will fill, and once the water flows out the Maintenance Valve close it. Then turn on the pump and Open the Outlet Valve. Again, make sure your Tank Valve is open.
2. As far as I know the system worked great. I ended up swapping the filter media in the left most canister for pot scrubbers; I do not really think it mattered but I wanted to try them out. I would clean the first stage canister (inlet) every month and then the other canisters every three to six months (don't clean them all at once). I ended up doing a full strip down after a year. I started to get a protein film on top of my water in the tank. I think this was due to some shrimp dying plus a massive die off of my HC Cuba, which was an issue independent of the filter. Once the oils and other gunk got in the water and filters I think it tainted the system and I needed a fresh start.
Note I went away from the Purigen in the system. I would never figure out how to control them.
3. Heater has been awesome. Not a single issue.
4. You just need to manage the water flow. Close all four Valves. If all four valves are closed the only water that will come out is the small amounts that are in the canister manifold piping. I would usually get a towel to put under the canisters but it would never get more than a little damp. But if you forget to close the valves all bets are off. For example, of you unscrew a canister and forget to turn off the Tank or the Inlet Valves you will drain the whole tank on to the floor (gravity). The issue I ran into the most was forgetting to re-open the valves once I was ready. I would turn the pump on but forget to open the valves running to the tank; nothing broke, it just caused a few head scratchers. The pump was on but no water moved.
Hope this help. I think some of these items are probably easier to understand once you do it once yourself. Just remember gravity and valve control.