• You are viewing the forum as a Guest, please login (you can use your Facebook, Twitter, Google or Microsoft account to login) or register using this link: Log in or Sign Up

DIY Project DIY ADA Style Aquarium Stand

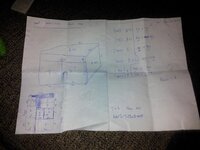
I'd make the bottom piece on the cutting list -2 or -3mm James as that is a full length cut so can be done at B&Q. I only realised afterwards so had my bro do mine but could have been done at B&Q. The sides need 2 or 3 mm taking off the leading edge from under the horizontal bar to the bottom. And B&Q (well mine) would not entertain this lol
 
That's awesome James, far better than my plans...

cabinetplans_zpsb6501163.jpg

:D
 

Attachments

  • cabinetplans_zpsb6501163.jpg
    cabinetplans_zpsb6501163.jpg
    132.8 KB · Views: 186
it does the same job though, if one of my measurements is out then yours is far better!
 
:D wow lol wouldn't have thought of a few things on there like leaving mm for hinges etc, rob any chance of a pic for the bottom of yours were door sits so can decide if want removable or not ? thanks so much again, so if I just take that into b&q they will fit it onto a sheet

thanks dean
 
wow lol wouldn't have thought of a few things on there like leaving mm for hinges etc

Neither did I initially :D lol

rob any chance of a pic for the bottom of yours were door sits so can decide if want removable or not

Do you mean James? LOL

I have to say Deano, with a single door, magnetic catches will be easiest for you (in that you won't need help to get hinges fitted, slithers taken off etc. If i'd had one door I may have considered it that way, but with two gotta be hinged ;)

Hopefully look something like this (they are just rested in place here):

20140201_154559_zps3d4aaff8.jpg

Thanks to this thread i've just ordered 4 x Blum softclose hinges and a 35mm forstner bit (thanks Nathan!! :D) and sent a text to my bro to forewarn him he'll be helping :)
 

Attachments

  • 20140201_154559_zps3d4aaff8.jpg
    20140201_154559_zps3d4aaff8.jpg
    42.3 KB · Views: 1,040
rob - James lol yeah I meant James :D I think :rolleyes: , cabinet looking excellent rob, how many screws you use up the back onto side panels ?also I am correct in saying that the side pieces sit ontop of the bottom piece and the back piece sits ontop of bottom peice also or do sides sit on bottom piece and back piece connect into back and side pieces ? also rob how you going about sealing etc?

Dean
 
Mine is a bit different, the base sticks out to the front of the cabinet (like it does as the top) for the doors to sit on. I don't know if you can quite make it out in this picture.

If you decide on magnets you'll have to do the same or the door would be resting on the floor.

 
oh right I see think that's a better idea, ok decided going to just go with ur idea james as easier to remove and looks just a good, think I will make the bottom longer for door to sit on and obviously door shorter but will need few mm for 5 coats or so of primer paint and varnish ?

great idea james and you can see the bottom line there and think will be all round easier and look better
 
rob - James lol yeah I meant James :D I think :rolleyes: , cabinet looking excellent rob, how many screws you use up the back onto side panels ?also I am correct in saying that the side pieces sit ontop of the bottom piece and the back piece sits ontop of bottom peice also or do sides sit on bottom piece and back piece connect into back and side pieces ? also rob how you going about sealing etc?

Dean

Not that many mate, I think 4? All glued where possible though.

I planned it so top sits on top of the sides and the sides sit onto the bottom. Once these parts were fixed together, fitting the back ensures the whole thing is square. The fact the back slotted in with just a little shove was reassuring and made me smile :) lol

Probably buy proper MDF sealer then use the watered down emulsion topped with varnish mate. Got the screw heads touched in with gloss yesterday ready for the polyfilla!
 
Alright Dean, it's much more straight forward. I'll change the drawings for you.

I just used watered down PVA (or something like that) to seal it and a few coats of oil based paint (satin finish) on mine.
 
Not that many mate, I think 4? All glued where possible though.

I planned it so top sits on top of the sides and the sides sit onto the bottom. Once these parts were fixed together, fitting the back ensures the whole thing is square. The fact the back slotted in with just a little shove was reassuring and made me smile :) lol

Probably buy proper MDF sealer then use the watered down emulsion topped with varnish mate. Got the screw heads touched in with gloss yesterday ready for the polyfilla!

what you mean got the screw heads touched up with gloss ?

also cheers James :thumbup: , think I am going to use dulux primer for difficult surfaces x2 coats then 2-3 coats of grey paint (what grey you use again james ?) then 2 coats of Varnish was Ronseal Diamond, water based.gloss varnish

its emulsion paint I need isn't it or satin

Thanks dean
 
excellent mate will that fit onto one sheet then and will b&q mark it out or should I ? also will measurement be ok with all then coats etc

Thanks dean
 
Yeah, you'll get that out of one sheet. I just printed out the bottom drawing with the cutting list and gave it to the bloke in the Builders merchants.


I can't remember the exact paint I used, to be honest the finish could be better, as I mentioned before I'm quite lazy so I didn't spend too much time sanding etc... I just gave it a quick going over with some fine sandpaper then rolled on three coats of paint.

It does look fine but you'd be better getting advice of someone else for the finish!
 
yeah thanks to James and rob VERY VERY helpful thanks again guys :clap: going to go today or tomorrow to get cut james

cheers again will keep you posted on my progress

and I am the same get bored easily but only want to have to do this once so might try take my time

Dean
 
I'm glad to have been of help for a change, I just hope it works out ok. :)

One more thing though, make sure you emphasize to them in B&Q that they need to be precise!
 
Polyfilla instructions tells you to touch in screw or nail heads with oil based paint before filling Deano, stops the filler from coming out (it will adhere to the paint better than a metal screw head). I've also found if i don't do it I get more sinking once filler is dried.

Take your time with it mate, at least front and sides :D lol
 
only think not 100 percent on now is the paint colour getting gloss varnish to finish but for the paint is it satin emulsion I need in a grey colour maybe satain grey
 
Back
Top