• You are viewing the forum as a Guest, please login (you can use your Facebook, Twitter, Google or Microsoft account to login) or register using this link: Log in or Sign Up

Ghosts first proppa scape

Ghosty

Member
Joined
9 Mar 2015
Messages
187
hello everyone

Got my new big tank today, very exciting, got an amazing deal
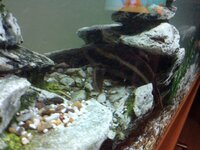
Bought a juwel Rio 240 with loads of extras all for 150£. Tank comes with an upgraded juwel filter,(from 600 to 1000lph pump)m
A lot of fake plants, and lots of big ornaments and other goodies

3 silver catfish
1 massive type of catfish
Some other type of catfish
Red tail shark.
2 rope fish(I think that's what there called)
A bn pleco
And some other fishs
All of witch are being taken to my lfs
Hoping to trade for some wood and rocks
Way to many catfish if you ask me

Lots of extras, witch I will pic up as I need a few things identified,

Tank is in amazing condition

Right so let's get started

Things I have ordered!
  • 1000lph powerhead to aid in wc and to provide better flow (delivered)
  • Hagen glo t5 54w twin ballast (delivered)
  • Two ge longlast bulbs (delivered)
  • Job lot of plants (list below) (delivered)

Things I already have

  • Westlands John innes no3
  • Jbl Aqua basis
  • Naturally found red clay (still needs processing)
  • Natrual Dorset coloured gravel

The plants
  • Valis (Leopard, spiral,twisted)
  • Java fern (have not ordered yet)
  • Crypt wendtii green
  • Sagittaria sub
  • Amazon sword
  • hydrocotyle leucocephala
  • pygmy chain sowed
  • Hygrophila coryombosa
  • Blyxa j
Plants I will add after intial setup
  • red ludwigia
  • Java fern narrow leaf and needle leaf
  • Polygonum so a paulo
  • Flaming moss
(Suggestions welcome)

The fish I will be adding
  • Platys x10
  • Dwarf gouarmi x5
  • Pearl gouarmi
  • Another gouarmi of similar size as a pearl gouarmi
  • tetra of some sort x20-30
  • My bristle nose, and maybe a female friend for him
  • assassin snails x3
  • and three other fish, of witch I haven't decided yet

Future upgrades
  • Fluval 406
  • co2 system,


below you will find everything I have done in a step by step fashion

Thank you all for any help and all opinions are welcome, I'll tidy the journal up as I go, so please be patient

Ghosty
 
Last edited:
Hello Bud, firstly you need to upload your pictures to a hosting service, something like Flickr, photobucket or any of the various. Once uploaded, when you're posting click the insert image box above the editing box, looks like a couple of mountains and the sun in landscape above your text and it will ask for the image link. Copy and paste the link from your chosen photo host.

Look forward to seeing them.
 
1. I had the 1000l/hr power head in Juwel internal filter, couple of issues. It is so powerful is collapses the filter foams after a short while and also (then ?) wears out the shaft and impellor. Never encountered this with the 600l/hr power head which after my 1000l/hr failure I put back. I bought the 600l/hr power head in 2005 and still going, where as the 1000l/hr I got in 2010 and is no longer with us....:mad:

2. Your faffing with lights is in another thread.

3. My 180l tank uses 20gr CO2 a day, thus 2Kg lasts 100days. You should be able to do similar. I have young children and free standing FE in the corner. As the FE doesn't have an interactive screen of any form and not connected to the internet children ignore it.
 
FE tucked in corner, angled regulator to make it easier to read. As the FE doesn't have an interactive screen of any form and not connected to the internet children ignore it.
wp20130415016.jpg
 
Helllo aaveragewhitebloke,

Thanks for that all sorted now will post pics below

Hey Ian

My faffing with the lights lol, it's all arriving tomorrow so fingers crossed, measured inside of tank and its 118.5cm, so as you said eiether a snug fit or none at all, but hey who cares lol

How much did the fe setup cost and where can I get refils,?
And the bloke BOught the tank of says its a 1000lph filter, but it doesn't seem like it to me, but I haven't torn tank down yet will do tomorrow, been very busy today, will clean the filter pump and impeller, and check, he supplied a box of bits n bobs aswell as everything else, spare impeller and old pump is there so we shall see
And also I meant I have purchased a all pond solutions powerhead, as I will be making a spray bar to cover the back of the tank, the left side with the powerhead and the right side using the juwel filter.


Picture of the tank
image.jpg

image.jpg8_zpsonsaibcf.jpg


When I got the tank it's housed a number of catfish one of witch was massive and made noises, took the, all to fish store as there not my sort of fish
The stripped catfish
image.jpg

The bloke at lfs said one of the fish was an Asian catfish or something it looked like a cross between a catfish and a rope fish know idea but I managed to get a large bit of drift wood for them all so not really bothered
image.jpg1_zpskpazu1hp.jpg
 

Attachments

  • image.jpg
    image.jpg
    193.3 KB · Views: 98
  • image.jpg
    image.jpg
    193.3 KB · Views: 73
  • image.jpg
    image.jpg
    193.3 KB · Views: 92
Last edited:
Mineralsing the soil

This process is known as mineralising the soil, below you will find steps as to how I did it, bare in mind this is slightly differant from others theories and study's, I had to adapt to what worked best for me, and drying the soil wasn't an option

This paragraph was written by AaronT,
Mineralizing the soil beforehand helps to speed the breakdown of organic materials in the soil. In turn the mineralized soil will help
icon1.png
shorten the initial algae outbreak period that many aquarists experience when using a soil substrate. Soil mineralization occurs from exposing bacteria, enzymes and other soil microbes to oxygen in a moist environment. The microbes break down the organic materials in the soil into bio-available minerals. As an added bonus these new bio-available forms of nutrients are generally only available to plants
icon1.png
and not to algae.

The materials

image.jpg


Step one, soak the soil for a few hours
image.jpg

Step two, remove floating materials
Sorry guys I forgot to take a picture during this part
Allow the buckets to settle for an hour then using a ladle the one you would use for your veg, has holes in, I removed the top layer(stuff that floated to the waters surface), I then got a trowel and mixed everything in the bucket up, waited a few hours and removed the floating material, I did this. Few times 4-5 times

Step three boiling the spoil
Right well there was no way my fiancé would allow me to use the stove, so..
I got hold of 30l bucket with lid, I poured the two buckets full of soggy soil into a bigger bucket and filled with boiling water, I got my trowel and mixed it all up, I out the lid on then left it for the night

image.jpg


Step four drying
As mentioned above I had to take loads of theories on using soil as a substrate and create a method of set up that worked for me, the best way to dry the soil would be to, after boiling leave the bucket and let all the water seep to above the soil, maybe a day, drain that, then get hold of a tarp or shower curtain type material, and allow the sun to dry it up, as mentioned not an option to me, a day of sunshine isn't going to be wasted watching the soil so what I did was
I waited and allowed the moist to work it's way to the top of the bucket, then I removed it, I did this other a day
image.jpg

I the. Gave it all a good break up and mix, waited and got rid of the built up water,
image.jpg


Step five (optional) extra additives
There is a few things in witch you add
  • Dolomite
  • Muriate of potash
  • Clay
However both dolomite and muliate of potash are best to add before you later the soil
I decided to add Jbl aquabasis to my soil as well as a thin layer at the bottom under soil

I add 3/4 a bag of Jbl to the soil
image.jpg

This is what the mixture looked like 3 hours after I mixed in the Jbl
image.jpg


I'm not going to dry the soil anymore, as I have to wait for my clay to process, so I will out it in the tank, and it should dry more there

Things to do tomorrow
  • sift through the existing gravel to remove the really fine white stuff
  • Clean the whole tank
  • Add gravel border
  • Add soil
  • Cut soil retainer,
  • Process clay


Sorry about the long posts, lots to cover

Any thing any of you think I have missed?

Ghosty
 
Last edited:
My faffing with the lights lol, it's all arriving tomorrow so fingers crossed, measured inside of tank and its 118.5cm, so as you said eiether a snug fit or none at all, but hey who cares lol
But it does matter, plants don't grow very well without light.....get it sorted we are all hanging on the edges of our tanks, waiting to see if standard 54W tubes can be forced to fit a Rio 240...Remember to severely dim the lights when starting or else everything, except the plants, will go green....

How much did the fe setup cost and where can I get refils,?
My FE comes from local distributer £10 each delivered to my work. Generally they are ones coming to their end of tank life (10 years and cylinder has to be retested), not allowed as FE's but fine for aquariums. I have a couple spare so can swap over without interrupting CO2. Variations in CO2 levels generally causes algae to get a foothold. They last me 100 odd days in 180l tank with a more yellow than green drop checker. I am just waiting at work for load's more, as we have moved into a new building and 6 of the FE's had a 11/2004 on them (so not allowed to be used after 11/2014 !!!). I just phoned the numbers on the FE at work, post office etc until I found someone who would sell me them. Easy.

The regulator and tubing came from CO2SuperMarket and is a single stage dual gauge regulator with solenoid and needle valve. Not had any issues, once I got all the leaks out of my CO2 system, works 100% each day every day, can set bubble rate from 1 per 10 seconds and too fast to count no issues. Notice the "once I got all the leaks out"...very important, if your CO2 rate is variable and hard to repeatedly set the you have a leak. Bubble rate does drop when tank gets empty, say below 500psi so either twiddle needle valve or change tank. A dual stage regulator will not do this.

Any thing any of you think I have missed?
Extension leads, multiple sockets, timers and other electrics...

Here you go, 4 switched sockets, 5 un-switched, 6 remote controlled timer sockets & 1500l/hr filter and air pump all squeezed into one side of a Juwel 180 stand.
3daae9ba-1c38-42f8-895d-de9ba96fb1dc_zps5f0147a5.jpg


I don't want to shift the water parameters to much to avoid losing any plants, may sound stupid to some of you but, seems logical to me
Sorry to call you Mr Stupid...:wacky:...but I think you are confusing fish with plants...one is green and doesn't swim and others are not green and swim...Fish can/may be affected by sudden water parameter changes, but never heard of plants be affected by water changes....:D Just do water changes, it is one of the best ways of removing "new tank ammonia" and other nasties. Remembering to add dechlorinator, as you don't want to wipe out the bacteria before you start.
 
Hello Ian
Yes I forgot my extension leads, will be going out today to get one and some stone and garden mesh, Hagen glo arrived today, so did my guitar hangers yah

The Hagen end caps, are just under 2cm, I'd say about 1.7cm, from were the base of the bulb sits it, to the base of the end caps, so maybe a very tight fit. But a very slight angle will solve that, plants should be here tomorrow, and so should the bulbs

im not adding any fish till the tank is full setup, as I have my 10g community waiting to have a bigger home,, I think I was referring to my crypts, but hey ho, lol

Was wondering if any of you nice fellows, had any Java fern I could perhaps purchase or pay pnp, I need a fair amount to cover my new bit of wood

Ghosty
 
Update

You'll love this Ian, I got the bulbs today and there like a foot to long, I ordered the wrong bulbs haha,
Anyway ordered the right ones and they will have them here by tomorrow, plants are arriving tomorrow but I'm not about, so the Mrs will plonk them in the tank as is, and I will clean out tank, and start setting up tomorrow,

The clay

I messed the clay processing big time, so have to get some more tomorrow, hopefully will have time to sort it, may not set up till clay is ready I haven't decided whether I think it will make a large enough differance, still in debate in my mind, will let you know how that goes,

The Hagen arrived today and it's a very nice bit of kit tbh, will post pictures up when I sort things tomorrow, still after a large amount of Java fern thought

Ghosty
 
plants are arriving tomorrow but I'm not about, so the Mrs will plonk them in the tank as is
Check with the supplier, if plants are grown emersed (as many are), I'd just keep them in a DSM type propagator (any old bin that's tall enough + humidity + light) & get the tank substrate & hardscape the way you like it, rather than quickly adding plants & wanting to change things later. Plants that are well packed & in decent shape to start will be fine to wait until you're home to decode what to do with them.

(ie I think that clay & drying the soil are worth the time ;))

It was very decent of your lfs to take in those fish - most in my area won't anymore.
 
I got the bulbs today and there like a foot to long, I ordered the wrong bulbs haha,
Result the bulbs fit....I just love it how you plan for all eventualities, make plan B, plan C etc etc everything covered then this happens.....
 
YHello alto and welcome to my journal

The supplier sent me an image of everything before sending, I have to say everything looks good other than the two crypts, but hopefully they'll bounce back, I have a few plants in my 10g that I can move over two
And my partner just going to submerge them in my ten gal, I'll be home early evening so no harm done, would take longer to set up a humid environment
And yes I decided I'm definitely going to sort some more clay, soil is in the tank now, so will have had a chance to dry somewhat before the clay is read
I got on well with my lfs have bought 90% of my stuff from them, and the fish were very healthy and big, the striped one got stuck in some ornament and was very stressed but there very good in there, fish always top condition

Hello there Ian

I know I was amazingly happy to get the bulbs and t5 system all on the same day, only to plug it all in and held the bulb up to the glass to see them happily balance on the top

Fingers crossed the knew onces fit, I am sending the other ones back, and going to get two differant branded t5 too see if a mix looks better to me

Also the juwel filter has a 600lph not a 1000 so that's a bonus

Well back to the tank
Spent all night with a colinder and my bath, the gravel that came with the tank was a mix of Dorset natrual and White fine gravel, so washed it thought and got it to all one size ish
Tanks been torn down and cleaned, the filter had two blue pads then a box of cirax then a green pad then a black carbon sponge and white poly, I will be heading down lfs to buy two course blue, I have spare white fluffy stuff,

Have come to the conclusion that some floating Plants will be the key element as to dull the light down to a suitabl level, maybe even starting with on bulb running then slowly build it up to two

Also light will be on a 5hr on 4off 5 on light cycle

Tank tear down and adding soil
Step one cleaned tank

image.jpg

Step two adding you extra ingredients

Dolomite should be added if your water is softdolomite is a distinct mineral composed of calcium and magnesium carbonate
Muliate of potash provides potassium, I would have used it but couldn't get it locally
Clay, only red clay is rich in iron, other clays are porous they will hold onto nutrients, I decided to use red clay, witch I found naturally. But I used the rest of my Jbl aquabasis, and decided to add pea size red clay balls on top of soil
image.jpg


Step three, adding gravel boarder
Please do not hold me accountable for this, I have no idea if it works, but I read that it stops alage so much creeping up the glass, and also stops you seeing the layers in the substrate
image.jpg

Step four, adding the soil
I Aimed for around an inch or so evenly, I made my back an inch and a half, as I know I will be adding a lot of stem plants around the back
image.jpg

Step five, soil retainer
once again I have seen others use it, i decided to use it cause I move plants a lot
image.jpg


Will add clay tomorrow evening, as I have to go dig it up and seperate it from sand and grit, shouldnt need to dry it to well as im adding it as tiny balls, so will dry it Intill it holds a shape, will post up step by step of that
Plants and bulbs arrive tomorrow
Pi will give the glass a first rate clean, and also figure out how to remove alage from the side of the filter that rests on the glass tomorrow also

Just a quick not, to some this journal may seem all sloppy, once the tank is passed its intial setup I will sit down and format my posts and label the images with headers, more of a simple mans step by step
Help sMe keep track of what I done, so then I know where I went wrong
So please be patient

Tomorrow fish people
 
Last edited:
Also light will be on a 5hr on 4off 5 on light cycle
You really need to start at say just 4 hours once, maybe just one tube and maybe even shield the light or else your new tank be an algae magnet.

Also light should really be on for just one time, their is a lot of evidence a "lighting siesta period" is actually detrimental to the plants in a high tech tank. Also you may have CO2 level and wasting issues trying to get optimum CO2 over two lighting periods.
 
Hey Ian,

I am trying to sit on the dge of not having to inject co2 hence the break in light cycle, in order for plants to release co2 of witch they can consume when the lights turn back on

I will be running one bulb, then a few times a week when I'm about, add the second bulb for the last hour of each 5 hr light segment, once I have covered the areas where my Java, mosses and crypts are with floating plants, I will slowly up the light source to both bulbs and full siesta cycle, I less you all think that the siesta isint worth it for me

Co2 is a near future investment, I am buying a fluval 406 week after next, and a co2 system I'll buy bit buy bit, as I never budgeted for the tank to set me back as much as it has lol
I was considering diy co2 but the Fire extingusher looks like a better option
But only if a 2kg can last over a few months, as refilling them may be costly haven't looked into it yet,

Ghosty
 
Last edited:
Also I was wondering if anyone on here, will help me plants this tank, I spent 40 quid online, and I don't think its enough

I'll happily pay postage
 
Right took me ages, and I forgot half the pictures, but I ended up just adding a sloppy clay mix to the tank, filled it up disturbed substare to much ended up with very very murky water, so emplyed the stank of water and refilled very slowly,

So now we're set to plant

And also how do I get more attention on my journal,

Finally finished took ages
Pictures below
 
Last edited:
Plants added were,

Amazon sword
Blyza j
2 differant types of Valis
Sagittaria sub
Pygmy chain swords
Hygrophila comp
Hygro leu
Crypt wendtii green

I also decide not to use the powerhead Intill everything has rooted, I also won't be trimming anything for at least a month, will be running lights for 5 hours a day, and will cover the tank for the rest, to avoid indirect light,

I have learnt a lot from doing this, I had planned to do a simple step by step, but processing natrual found clay was troublesome for me, took ages, ended up just using clay that handy had time to dry out so like a sloppy mes,, sand and grit was removed that's as far as I got, ended up having to to empty tank drain and refil, as in my excitement I distubrpted the gravel and soil, mad a merky mess, no bits however just murkiness took me all evening,

The t5 lighting system went in a dream, I ended up mounting it in the cabinet and feeding the tube holders over the top very neatly and added bounces was it was an exact fit, the lip that is on the juwel bracing,(that lip around the top of the tank, the one under the one for the flaps) the thing just sits there spot on. I ended up wedging some card for it to sit 2 inches or so above the water the t5 sits 50cm above gravel bottom, will add floating plants,

I wanted to ask about flow, every leaf flickers ATM, and I was thinking once everything grew in I would need more, I wanted a spray bar along the back of the tank, but don't think that would work I till I get my fluval 406, I was wonderingg if I did meed to add more flow, could I not just use a little internal with spray bar, pushing botto, left to right,( towards the juwel filter?

And is there a natrual stone I could add that would natrual supply more carbon, how is it done in nature

Ghosty
 
I was wondering if any one can help,

I have a few questions

I have only just seen on the side of the tank where the filter goes that the filter is covered with alage, couldn't see it without being right up close,

And I want to avoid pressurised co2 And am coming to the belive that 2 x 54w t5 is to much light, I'm at 2wpg or around 50/60 par, at substare level,, I was going at add some floating plants, to dull it down,mh opening to avoid co2 injection, could I not dose like excell or api co2 booster,

Would the combination of floating plants and liquid co2 avoid the use of pressurised

Also would the filter need to be removed and alage cleaned off? Or could I leave it

Ghosty
 
Back
Top