
MrB15hop
Member
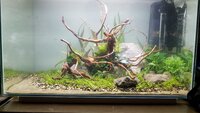
So, some of you may remember last month, when my little boy and his friend decided to be super helpful, and dump 2 tubs of food into my Superfish Home 60, while I was away for 2 days working.
My wife did her best, but the scape took a bit of a beating.
In fairness, it could have been saved with a few hours of replanting, but, much like a petrolhead that's crashed their pride and joy, it wouldn't have been the same...to me at least.
Here's the last nice shot I have of it.
It never got a name, and as it was my first proper attempt at scaping, more of a test bed, it never got a journal either.

It didn't even get the trim that it needed when I took this.
So, onwards...
Having already convinced myself that it NEEDED re-scaping, I picked up 3 bits of azalea root from P@H, and a few extra pots of plants with the idea that I was recycling the old scape as much as possible.
I had originally intended to use 2 bits of driftwood that I had spare, but after staring at them for a week, I couldn't see past the slight colour difference in them, so I went for the roots instead.
Stripping down the tank took an absolute age, but I managed to get all the plants, and the remaining fish into my holding tank, along with the filter and heater, and get them comfortable for a few days.
In the spirit of recycling, the substrate came out in 3 separate buckets.
1 mostly soil
1 mostly gravel and slate chipping
And 1 of a really sludgy mixture of all of the above and the majority the remaining mulm. I cleaned off the first 2, and ended up binning the last one. (After I'd taken a few handfuls to build up the rear substrate)
I played with the general scape for a few days. I knew that I wanted the big piece coming around the big stone, but I couldn't get it to sit right. In fact, the more I tried to pull the whole thing to the right, the more it looked awkwardly centred.


I got to the point of changing it all up, trying different angles and whatnot,
As I was moving things around, it ended up at an angle I'd already discounted, smack in the middle of the tank, but, somehow it worked... I had that flash of inspiration, and then this happened...

Admittedly, I'd had a couple...
And the Samsung S8 Camera doesn't offer the depth that you get in person,
but, I sat back for quite a while, staring at the little stick man smiling back at me, complete with stick arms out for a hug...
Now I will say, that the rule of not centering was niggling in the back of my head the whole time, so my compromise came in the form of a void.
From top to bottom, there is about an inch void, dead centre. It doesn't take things out of the centre line of sight, but it eases my mind knowing it's there...sad, I know.
Also, the shape and height of the substrate was primarily dictated by the soil and stone mix that I was recycling.
I had the sand and gravels already, so used those to be able to push it all back a bit, I was still struggling for depth though, so I also took a little inspiration from Juris and George's recent video from Juris' place, and kept the sand as low as possible at the front.
Onto planting,
I used as much of the Monte Carlo as I could, the rest was kind of algae ridden, as were most of the other plants in some way or other.
Around the front stones went some crypt Parva, and through the middle.
Behind the bigger left stone there's some Blyxa, but it's not looking great at the moment, and then directly behind that there's a blend from the Monte Carlo, through Crypts Parva and Nevelli, and some Lilaeopsis Brasilienis, up to the bigger Crypts behind the wood (essentially acting as hair in my vision), those are a blend of Kasselman Brown, Wendtii Green and Brown, I think there's another one or 2 in there too, but I can't find all my old plant cards.
Moving to the right, behind the big stone, there's a blend of stems, Rotala Rotundafolia, Rotala Wallichii, some Hygrophila, and some Clinopodium Brownei. I'm just going to see how these do, let them grow a bit and pick my favourite...
In front of the wood, at the base, there's a few portions of Anubias Nana Bonsai and a pot of Bucephalandra sp. Red, flanked by some Taxiphillum Barbieri (Java Moss?)..
Over to the right hand side and I was running out of ideas, and plants, but I knew I had to house the filter and the heater, so I had to leave some space. (Hence the problems moving the scape rightwards)
Anyway, as I was tinkering with ideas I managed to put the last feenplants close enough together to create the sort of bushy effect. There's an offcut of my Anubias Nana stuck on a small stone, some lobelia cardinalis, and some limnopholia sessilflora, all surrounded and blended with the remaining smaller Crypts to bring it back down to the front.
I pinched another tiny sprig of Anubias and stuck it to that stone...
I'm pretty sure it shouldn't stand quite so straight, but I think it adds to the whole,
Cartoon, Stick man, not so serious scape vibe...
All planted up...

My wife did her best, but the scape took a bit of a beating.
In fairness, it could have been saved with a few hours of replanting, but, much like a petrolhead that's crashed their pride and joy, it wouldn't have been the same...to me at least.
Here's the last nice shot I have of it.
It never got a name, and as it was my first proper attempt at scaping, more of a test bed, it never got a journal either.
It didn't even get the trim that it needed when I took this.
So, onwards...
Having already convinced myself that it NEEDED re-scaping, I picked up 3 bits of azalea root from P@H, and a few extra pots of plants with the idea that I was recycling the old scape as much as possible.
I had originally intended to use 2 bits of driftwood that I had spare, but after staring at them for a week, I couldn't see past the slight colour difference in them, so I went for the roots instead.
Stripping down the tank took an absolute age, but I managed to get all the plants, and the remaining fish into my holding tank, along with the filter and heater, and get them comfortable for a few days.
In the spirit of recycling, the substrate came out in 3 separate buckets.
1 mostly soil
1 mostly gravel and slate chipping
And 1 of a really sludgy mixture of all of the above and the majority the remaining mulm. I cleaned off the first 2, and ended up binning the last one. (After I'd taken a few handfuls to build up the rear substrate)
I played with the general scape for a few days. I knew that I wanted the big piece coming around the big stone, but I couldn't get it to sit right. In fact, the more I tried to pull the whole thing to the right, the more it looked awkwardly centred.
I got to the point of changing it all up, trying different angles and whatnot,
As I was moving things around, it ended up at an angle I'd already discounted, smack in the middle of the tank, but, somehow it worked... I had that flash of inspiration, and then this happened...
Admittedly, I'd had a couple...
And the Samsung S8 Camera doesn't offer the depth that you get in person,
but, I sat back for quite a while, staring at the little stick man smiling back at me, complete with stick arms out for a hug...
Now I will say, that the rule of not centering was niggling in the back of my head the whole time, so my compromise came in the form of a void.
From top to bottom, there is about an inch void, dead centre. It doesn't take things out of the centre line of sight, but it eases my mind knowing it's there...sad, I know.
Also, the shape and height of the substrate was primarily dictated by the soil and stone mix that I was recycling.
I had the sand and gravels already, so used those to be able to push it all back a bit, I was still struggling for depth though, so I also took a little inspiration from Juris and George's recent video from Juris' place, and kept the sand as low as possible at the front.
Onto planting,
I used as much of the Monte Carlo as I could, the rest was kind of algae ridden, as were most of the other plants in some way or other.
Around the front stones went some crypt Parva, and through the middle.
Behind the bigger left stone there's some Blyxa, but it's not looking great at the moment, and then directly behind that there's a blend from the Monte Carlo, through Crypts Parva and Nevelli, and some Lilaeopsis Brasilienis, up to the bigger Crypts behind the wood (essentially acting as hair in my vision), those are a blend of Kasselman Brown, Wendtii Green and Brown, I think there's another one or 2 in there too, but I can't find all my old plant cards.
Moving to the right, behind the big stone, there's a blend of stems, Rotala Rotundafolia, Rotala Wallichii, some Hygrophila, and some Clinopodium Brownei. I'm just going to see how these do, let them grow a bit and pick my favourite...
In front of the wood, at the base, there's a few portions of Anubias Nana Bonsai and a pot of Bucephalandra sp. Red, flanked by some Taxiphillum Barbieri (Java Moss?)..
Over to the right hand side and I was running out of ideas, and plants, but I knew I had to house the filter and the heater, so I had to leave some space. (Hence the problems moving the scape rightwards)
Anyway, as I was tinkering with ideas I managed to put the last feenplants close enough together to create the sort of bushy effect. There's an offcut of my Anubias Nana stuck on a small stone, some lobelia cardinalis, and some limnopholia sessilflora, all surrounded and blended with the remaining smaller Crypts to bring it back down to the front.
I pinched another tiny sprig of Anubias and stuck it to that stone...
I'm pretty sure it shouldn't stand quite so straight, but I think it adds to the whole,
Cartoon, Stick man, not so serious scape vibe...
All planted up...
Attachments
Last edited:
 Which helped me build my CO2 kit for less than £50.