• You are viewing the forum as a Guest, please login (you can use your Facebook, Twitter, Google or Microsoft account to login) or register using this link: Log in or Sign Up

LED DIY

mow said

Member
Joined
3 Dec 2016
Messages
196
Location
enfield
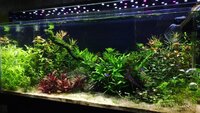
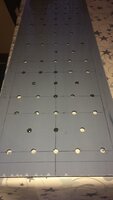
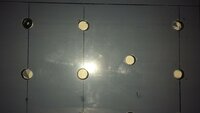
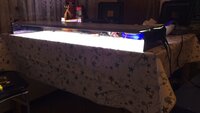
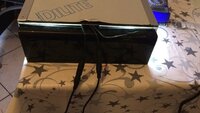
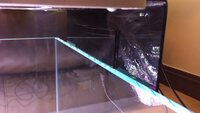
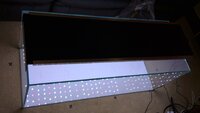
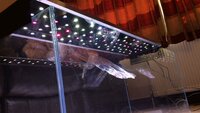
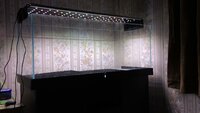
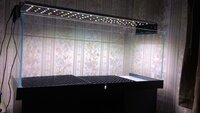
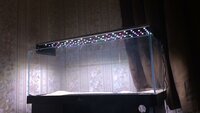
Here is my diy led fixture it Took me a week to complete . It's a 81w fixture.

Here are the tools and items i used to build this fixture.
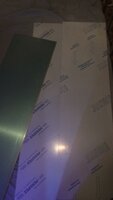
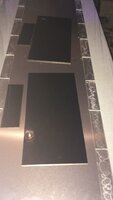
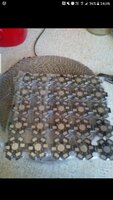
1.Black diabond sheet 960mm x 260
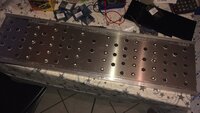
2. 1mm aluminium sheet 960x260mm
3.3mm perspex 960x.260mm
4. 2mm cast acrylic 50x 600mm
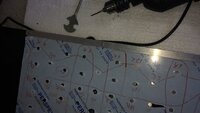
5. u channel i do not remember the size but its for holding the pieces together
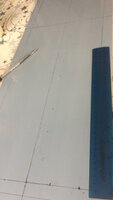
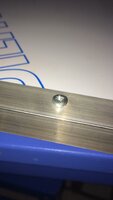
6. m3 screws ,2.5mm drill bit and m3 tap
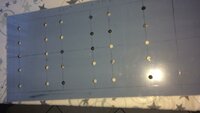
7. 90 led chips 1w epistar(20 full spectrum 30 10000k and 40 6500k) and three 18-36w 1w led drivers from china .
8. 3 DC power jack female to male 2metre
9. 100 Heat sink base plate
10. acrylic cutter blade tool
11.22awg black and red wire
12. thermal conductive heat sink plaster
13. 12mm drill bit to drill the holes on the perspex

Any questions please ask i will try my best to answer
 

Attachments

  • IMG_3398.JPG
    IMG_3398.JPG
    215.5 KB · Views: 736
  • IMG_3414.JPG
    IMG_3414.JPG
    247.9 KB · Views: 620
  • IMG_3415.JPG
    IMG_3415.JPG
    385.5 KB · Views: 622
  • IMG_3419.JPG
    IMG_3419.JPG
    288.5 KB · Views: 636
  • IMG_3420.JPG
    IMG_3420.JPG
    394 KB · Views: 618
  • IMG_3456.JPG
    IMG_3456.JPG
    277.7 KB · Views: 623
  • IMG_3523.JPG
    IMG_3523.JPG
    422.1 KB · Views: 636
  • IMG_3499.JPG
    IMG_3499.JPG
    187.1 KB · Views: 638
  • IMG_3524.JPG
    IMG_3524.JPG
    258.2 KB · Views: 622
  • IMG_3553.JPG
    IMG_3553.JPG
    496.8 KB · Views: 670
  • IMG_3591.JPG
    IMG_3591.JPG
    384.6 KB · Views: 676
  • IMG_3596.JPG
    IMG_3596.JPG
    424.6 KB · Views: 636
  • IMG_3596.JPG
    IMG_3596.JPG
    424.6 KB · Views: 622
  • IMG_3597.JPG
    IMG_3597.JPG
    426.2 KB · Views: 627
  • IMG_3603.JPG
    IMG_3603.JPG
    461.3 KB · Views: 634
  • IMG_3604.JPG
    IMG_3604.JPG
    341.3 KB · Views: 617
  • IMG_3605.JPG
    IMG_3605.JPG
    540.9 KB · Views: 648
  • IMG_3642.JPG
    IMG_3642.JPG
    445.7 KB · Views: 644
  • IMG_3644.JPG
    IMG_3644.JPG
    454.6 KB · Views: 658
  • IMG_3657.JPG
    IMG_3657.JPG
    387.1 KB · Views: 536
Last edited:
IMG_3398.JPG

1.sheets bought in the uk

IMG_3414.JPG

2.measure with a ruler where the holes are to be drilled on the perspex

IMG_3415.JPG

3.half of the holes drilled

IMG_3416.JPG

4.Drill bit used is from b&q i think it was 12mm u can used waterver drill but size you want but be careful and use a flat surface to drill the perspex as it can crack
IMG_3418.JPG

5.All drilled
IMG_3419.JPG
IMG_3424.JPG


IMG_3456.JPG

6.Glued clear acrylic on the side of the aluminium sheet so that i can have space for the leds and the wires when the u channel is put on

IMG_3498.JPG

7.Bought these from china led heatsinks


IMG_3523.JPG

8.Making sure all fits perfect and drilled holes with a 2.5mm drill and used an m3 tap so that i can screw the fixture

IMG_3524.JPG

9.here is the screw inserted

IMG_3553.JPG

10.Glued all the heatsink and led chips together , i do not have a picture showing wiring diagram but you can ask if you have any questions

IMG_3591.JPG

11>Booom and it lights up


IMG_3597.JPG

12.Here is the dc wires i used . each wire has its own channel. you can use one two or all three channels if you want

IMG_3605.JPG

13.And here is the final product
IMG_3642.JPG
IMG_3657.JPG


Tank size: optiwhite 100x40x40 . I understand that i am missing allot of things in this DIY tutorial but do not hesitate to ask i will try my best to help.
 

Attachments

  • IMG_3420.JPG
    IMG_3420.JPG
    394 KB · Views: 186
Last edited:
Nice build.

How hot does it get after running a few hours? I'd be slightly worried that there isn't much of a heat sink and very little airflow - and the dilite sheet might act as an insulator.

Cheers, Mark


Sent from my A0001 using Tapatalk
 
hey mark,
im using 1mm aluminium plus diabond on top which acts like a heat sink too. i have run this for 24 hours and it does not get hot at all. And i have also placed the led chips far apart . I used 1w led so these dnt produce that much heat as 3w led chips. And for the air there is holes drilled so its oki that way. I have one built on my old juwel and i only used diabond sheet and its been running for a year with no issues.
 
Nice build.. :thumbup: But might want to take a look at COB led units if you ever want to build one again. Those 1 and 3 watt cree high powers getting outperformed and out of date by now. :) COB led also is more cost effective, need less units for same performance.
 
hey zozo thanks and i am using epistar not cree and look at this guy he is using COB led chips and epistar leds together. And on his other videos his only using epistar chips and his aquariums look amazing. Its about mixing lights together to get the best colour. In my fixture i have used full sprectrum /10000k and 6500k leds. And there is not much difference between cob and high power led chips in aquarium use .http://www.cob-led.com/COB-LED-Advantage-Chip-on-board.html
 
Yes that's a nice looking tank.. :) I guess best color is a personal preference. But i mean, cree or epistar doesn't make much a difference regarding model. Constructionaly you would already have an advantage with the cob units.. E.g. currently building me a little fixture for a nano tank. With 2 COB led units each + 2000 lumen. If i would have taken highpower cree or epistar on a star PCB i would have needed to fix a lot more units to it to get same output, than just 2 cob units. :) 1 watt high power has maybe 100 / 120 lumen each, that would have been around 40 leds etc. And COB can save a lot of work and probably cost. So i was not refering to beter light and or color mixture. Just cost effective building..

Not yet all ordered material arrived, but when it does and the build is ready. Planning a little journal for it..

Thanks for the link thats interesting..
 
i get your point now can i see your cob build :) . How much is your budget i built one for my nano tank as well 2 months ago.
 
Yes sure you can see, as said not all material i need arrived but is ordered. I'll make a journal about it. With al materials used. Regarding cost about $20 maybe less for a 40cm light stand completely made out of aluminium with 4000 lumen output. (without controler and PSU ofcourse) It's only half way finished now. I was out of M4 blind rivet nuts and some M3 stand off columns i need to finish it..

You know ebay orders ;) can take e few weeks.. Ordered it last week. So have to wait. But once i have it all it'l be finished in about 2 hours work.
 
nice this cost me around £70 but as you can see i wanted to build a nice fixture for the optiwhite tank. Made sure it matches the cabinet rather than splashing more than £100 for a brand one which you can't even upgrade or control. Let me know once your done with your build so i can see the end progress and i know those ebay orders are a pain :arghh:
 
following up on this thread after a week and a half of planting using co2 and the led that i made my self. Plants are growing no signs of algae yet . The led is 81 watts total . First channel i have 36 leds second channel is 26 and the third is 19 watts . First week i used the first and third channel which is a total of 55 watts on my second week i am using first and second channel which is a total of 62 watts. light are on from 20:00 to 00:30 so 4 hours and half and co2 from 18:00 to 23:00 which is 5 hours.Using a bazooka diffuser atm as i am waiting on an inline diffuser .I live in london and i use 100 percent tap water nothing else.The scape is not finished i will put hair grass in coming weeks and I am also using ei salts and magnessium too Any questions please ask :).
IMG_4108.JPG
IMG_4110.JPG


IMG_3728.JPG
IMG_3729.JPG
IMG_3732.JPG
IMG_3746.JPG
IMG_3779.JPG
IMG_4011.JPG
IMG_4100.JPG
IMG_4101.JPG
IMG_4102.JPG
IMG_4104.JPG
IMG_4106.JPG
 
IMG_4725.JPG

following this thread up. Leds are working fine as i said before i am going to play with the channels. currently i am using only 2 channels out of three which in total is 55 watts power. I tried to use the other channel and one i am currently using which is 65 watts and started to get green spot algae on the glass. Overall i had little but of diatoms which got taken care of in a day by amano shrimps. Little bit of bba on one java fern which is now gone i am sure it was because of co2 fluctuation but now my co2 levels are stable. The light is 81 watts but i am only using 55 watts and everything is growing fast, i am trimming weekley and also 50-70 percent water change weekley. Lights are on 6 hours a day 25 watts from 19:30 then from 20:00 55 watts till 00:00 back to 25 watts till 01:30.
 
another update pictures taken on 4/7/2017. All led working as they should i havent encountered any problems till this date. Plants are growing like crazy with 60 watts on for 5 hours and 2 hours with only 25 watts.
IMG_4943.JPG

hygrophila polysperma
IMG_4945.JPG


ludwigia glandulosa converting from emersed, cabomba red , pogostemon stella and myriophyllum mattogrossense
IMG_4947.JPG
 
This looks great, I'd love to do something similar for a tank I'm setting up but have no experience with this. I've got a few questions I'd appreciate help with from how you've done yours:

Firstly the layout of it, am I correct in saying that it is

Black diabond sheet (outer top layer).
Aluminium sheet (acts as heat sink).
Wireing of LEDs between these layers.
Perspecs sheet (LEDs go through this).
Acrylic sheet (bottom layer facing the water).


And for the LEDs, the Ines which look red in your photos - are these the full spectrum ones?

Thanks
 
hey lemw,
yes every thing you mentioned is correct i can send you all the link for the items i bought from china and here in the uk. Also i can give you more details here , send me your tank dimension and what you intend to use it for, high tech or low tech and i can let you know what will be the best wattage for you.The reason i am asking all these details its because you might not need an aluminium sheet in the middle because if the fixture is the less than 40 watts then you will only need the diabond sheet.
 
Back
Top