• You are viewing the forum as a Guest, please login (you can use your Facebook, Twitter, Google or Microsoft account to login) or register using this link: Log in or Sign Up

Irritating Silicone workwork

Aqua360

Member
Joined
15 Feb 2016
Messages
2,222
Location
UK
Hi all,

I recently had some opti's made up for me by a company relatively near to me, I'm happy with the glass thickness and clarity; but am bugged by the silicone work.

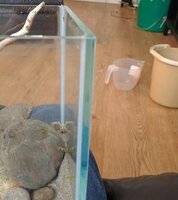
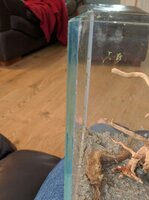
I'm probably spoiled and biased after seeing the superb craftmanship of Ada tanks on here, but is there any way I can get rid of the liberal silicone applied at each corner of my tanks as shown in the pics?

I hope the pics are clear, can see where the glass is in line, and where the silicone continues for a few cms.

If its possible to tidy it, without jeopardising the structural stability of the tank; is there a specific method with a Stanley blade? Scraping sideways, or cutting lengthways etc? Sounds simple, but I'm curious

Thanks in advanceIMG_20160914_002136.jpg IMG_20160914_002112.jpg IMG_20160914_002136.jpg IMG_20160914_002112.jpg IMG_20160914_002136.jpg IMG_20160914_002112.jpg
 
PS, the glass clarity on the first pic looks green and float glass due to the lighting
 
I cleaned the silicon up on my shallow using a craft knife and stanley knife blade. Mine is holding out fine...so far (touch wood), but I was careful only to remove the excess from the glass and not to compromise the actual joint.
Apparently, it's only the silicon in between the joints that adheres the glass...http://www.ukaps.org/forum/threads/cleaning-up-silicone-advice-please.37164/
 
Yes you can cut it out with a stanley blade and scrape it clean after the seams are cut out. But the tank needs to be empty and all of it needs to be out, new kit does not attach very good to old cured kit.

Cutting it length ways where the point of the blade touches the glass is where you start, dont cut it where the point of the blade touches the seam between the glass panels. Maybe you need a scrapper to gently help to get the seam out in one pull. Make sure you use a new very sharp blade and scraper. Dull blades don't cut they rip, as soon as you need to apply pressure the blade tip is getting dull, glass is relatively hard and makes stanley blades dull sooner then you think.

After it is cut out, then scrape it clean, check with a strong light and keep scraping till there is no cured piece of silicone left. It needs to meticulously clean, if not the tiniest speck of old silicone will show once it is kit again. Make sure you do not push the blade into the seam between the panels, again a sharp blade will prevent you from applying to much pressure.. A dull blade will make you push in there much easier, the less force you need the beter.

If all is cleaned out perfectly degrease it with alcohol and a lint free cloth. And check again if there is no speck of old silicone left, do not double check but triple check. 🙂

Then apply masking tape in the corner and leave free space in the desired seam thiknes in the corner. Once you worked all around and double checked again if all is straight, check again if all is clean, degrease it again with alcohol.

Now apply the new kit, don't use to much even if you use masking tape. First seam done, spray a little water with dishwashing soap on the silicone multi tool and straighten the seam and push it into the corner.. This tool also scrapes off all excess silicone. Wipe the tool clean.. Go like that all around the tank and when all corners are done pull the masking tape gently and cleanly out. You got one go, that's it.

After that, it is done, all faults are permanent, don't look at it don't tough it for at least 24 hours. If all is as desired after that, you're good to go.. If not wait again for a few days preferably a week, to let it fully cure and start over again. Cleaning out fresh kit within the first days is a job you do not want to start on. It is still much to soft.

This kitting part and removing of masking tape you need to do rather quickly with in the skinning time of the kit. +/- 12 minutes depending on the temperatur. 12 minutes is average at room temp. This is where most people fail and panic in the time pressure, that's the only difficult part of it, keep it cool work steadily and relaxed. Preparing you can work a day on if you like, finnishing it off neatly is 12 minutes tops. :thumbup:

Not using masking tape, needs years of kitting experience and a very steady hand and a very professional kit gun. Obviously your builder laked one of it and not used masking tape. 😉
 
Last edited:
Yes you can cut it out with a stanley blade and scrape it clean after the seams are cut out. But the tank needs to be empty and all of it needs to be out, new kit does not attach very good to old cured kit.

Cutting it length ways where the point of the blade touches the glass is where you start, dont cut it where the point of the blade touches the seam between the glass panels. Maybe you need a scrapper to gently help to get the seam out in one pull. Make sure you use a new very sharp blade and scraper. Dull blades don't cut they rip, as soon as you need to apply pressure the blade tip is getting dull, glass is relatively hard and makes stanley blades dull sooner then you think.

After it is cut out, then scrape it clean, check with a strong light and keep scraping till there is no cured piece of silicone left. It needs to meticulously clean, if not the tiniest speck of old silicone will show once it is kit again. Make sure you do not push the blade into the seam between the panels, again a sharp blade will prevent you from applying to much pressure.. A dull blade will make you push in there much easier, the less force you need the beter.

If all is cleaned out perfectly degrease it with alcohol and a lint free cloth. And check again if there is no speck of old silicone left, do not double check but triple check. 🙂

Then apply masking tape in the corner and leave free space in the desired seam thiknes in the corner. Once you worked all around and double checked again if all is straight, check again if all is clean, degrease it again with alcohol.

Now apply the new kit, don't use to much even if you use masking tape. First seam done, spray a little water with dishwashing soap on the silicone multi tool and straighten the seam and push it into the corner.. This tool also scrapes off all excess silicone. Wipe the tool clean.. Go like that all around the tank and when all corners are done pull the masking tape gently and cleanly out. You got one go, that's it.

After that, it is done, all faults are permanent, don't look at it don't tough it for at least 24 hours. If all is as desired after that, you're good to go.. If not wait again for a few days preferably a week, to let it fully cure and start over again. Cleaning out fresh kit within the first days is a job you do not want to start on. It is still much to soft.

This kitting part and removing of masking tape you need to do rather quickly with in the skinning time of the kit. +/- 12 minutes depending on the temperatur. 12 minutes is average at room temp. This is where most people fail and panic in the time pressure, that's the only difficult part of it, keep it cool work steadily and relaxed. Preparing you can work a day on if you like, finnishing it off neatly is 12 minutes tops. :thumbup:

Not using masking tape, needs years of kitting experience and a very steady hand and a very professional kit gun. Obviously your builder laked one of it and not used masking tape. 😉


I cleaned the silicon up on my shallow using a craft knife and stanley knife blade. Mine is holding out fine...so far (touch wood), but I was careful only to remove the excess from the glass and not to compromise the actual joint.
Apparently, it's only the silicon in between the joints that adheres the glass...http://www.ukaps.org/forum/threads/cleaning-up-silicone-advice-please.37164/

Your thread is exactly what I mean 🙂 I have a dry one there, I may toy with it today, absolutely going to avoid going near the glass joint, it's just the bit where it extends over, is doing my head in
 
Here's a before and after on one of the joints, hope this hasn't threatened the structural stability :/

The difference is night and day, the tank untouched looks like one of those stupid petsmart ones with the thick corners, looks much much better altered (albeit bit rough just now).

Just to check, given that I haven't touched the silicon where the glass meets glass, should it in theory hold? Or does the silicon that extend out horribly, add to its strength?
 

Attachments

  • IMG_20160914_143943.jpg
    IMG_20160914_143943.jpg
    927.3 KB · Views: 115
  • IMG_20160914_143951.jpg
    IMG_20160914_143951.jpg
    872.7 KB · Views: 120
I should add, the tanks in question are 12l and 20l respectively
 
The risk is if you have life stock, they pay the price if it starts to leak over night and is empty the next morning.. A dripping tap can easily drip a bucket full over night, so a 12 liter tank can be empty that fast as well. But on the other hand, it probably is 4mm glass, that's about the minimum what is used in tank building and in such small dimensions it is pretty strong and doesn't hold much pressure nor tension.. The bigger tanks or glass panels are the more pressure, the more glass bends, the more stress and tension on the joints.

I once used a 25 liter tank as skybox upside down above a pond, it had a chiped corner at the bottom panel because it bumped into a wall one day with storing.. And it is still water thight, placed it upside down and inclined it for several centimeters and sucked it full with water so all traped air would accumulate in one corner. It stood like that for a year upside down above the pond supported on it's side panels only.. Then it stood a summer long in the garden on an old shakey table to breed daphnia, wigling it's way through the summer.. And after all this punnishment still not leaking i was convinsed enough it probably never will as long as i do not drop it on the floor.. 🙂 So now it already stand for over a year in the kitchen as aqaurium for storing plants.

Small glass panels don't do much, you need rather some surface area before glass starts to bend and cause stress on the joints. It is darn strong in such small dimensions.

But don't pin me down on it, it's at own risk.. I would test it and punish it and stress it like that for a while.. If it takes that and stays tight it probaly will for ever if it stands stress free. :thumbup:

The glass itself is really thick, I'll proceed with caution
 
I thought the silicone looked nice and tidy 😵.

It is, but still distracts from the tank itself; whether it's cause it's not clear silicone (white) or whether it's cause the tank is small; it's definitely noticeable though.

Probably spoiled looking at all the super high quality tanks on here from other members 🙂
 
Back
Top