
Hi Team
As we all know the lighting unit in the hood is not up too much.
In my case, I think the one in my hood is nearing its end of life as the Blue LED will not switch off sometimes.
I've started rescaping this aquarium "more on that later"...therefore this was an ideal time to fit a new light unit.
I was toying with the idea of a Chihiros light unit but apparently, it gets very hot.
The basic items required a small drill, a small screwdriver, a hacksaw, and pliers.
Twinstar 30B 2 light unit.
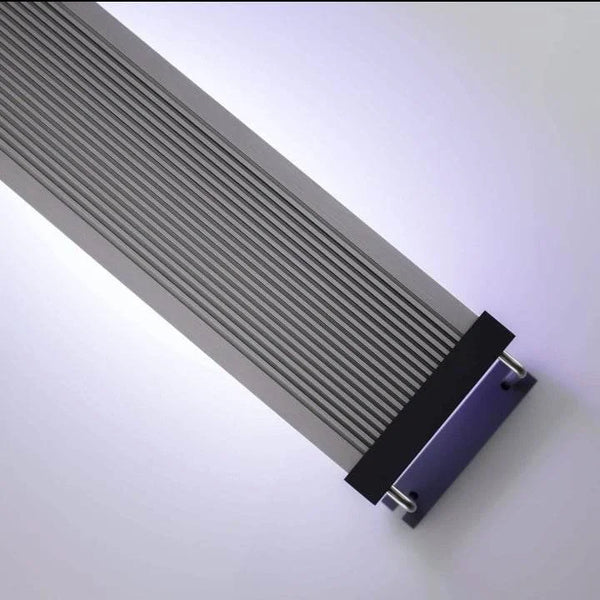
 www.horizonaquatics.co.uk
One Acrylic Finger Door Push Plate.
www.horizonaquatics.co.uk
One Acrylic Finger Door Push Plate.
Screws and nuts.
M4 12mm
 Silicone.
Amazon product ASIN B006C65ZCO
1: Cut two notches for the plate to fit under the hood, Use a small hacksaw and pliers to break the notched pieces off the plate.

2: Use the Finger Plate as a template to mark the holes on the hood.
It's not central but it is good enough.

3: Drill holes....and silicone the plate onto the light unit.....I tried Aquarium Silicone but it was out of date and didn't hold the light unit, I think it may have been a combination of out-of-date and the heat from the unit?
I let the new silicone cure for 24 hours as per the instructions.
" The above silicone is used for cookers and high temperatures I assume it is safe enough"
4: Push the screws through the holes and use masking tape to keep them in place, flip the lid over add two washers per screw as spacers, and fit the light unit onto the screws, add the nuts, and tighten up!

5: Finished


End note!
You could take the Twinstar apart drill holes through the top of the light unit and attach it to the face plate!
I will let you know if the light unit has detached itself from the silicone and is in the aquarium tomorrow 🤞

Twinstar is still on the plate as of 19th Nov 2024!
hoggie
As we all know the lighting unit in the hood is not up too much.
In my case, I think the one in my hood is nearing its end of life as the Blue LED will not switch off sometimes.
I've started rescaping this aquarium "more on that later"...therefore this was an ideal time to fit a new light unit.
I was toying with the idea of a Chihiros light unit but apparently, it gets very hot.
The basic items required a small drill, a small screwdriver, a hacksaw, and pliers.
Twinstar 30B 2 light unit.
Twinstar LED Light 30B v2 (adjustable)
Twinstar LED Light 30B v2 Twinstar B-Line II has ideal clarity, natural colors and improved design. Now it offers more RGB for better colours and plant growth, controller and new sizes. The new Twinstar B Line is the perfect lighting for an aquarium with or without plants, where fish or shrimps...
www.horizonaquatics.co.uk
Screws and nuts.
M4 12mm
M3 M4 M5 M6 Black Phillips Nylon Screw Nut Washer Sets 25PCS Machine Screws | eBay
25 piece sets of nylon screws, washers and nuts. Select the size (M3 - M6) and length of screw you require. If you encounter any problems with your order, we are here to help.
www.ebay.co.uk
Amazon product ASIN B006C65ZCO
1: Cut two notches for the plate to fit under the hood, Use a small hacksaw and pliers to break the notched pieces off the plate.
2: Use the Finger Plate as a template to mark the holes on the hood.
It's not central but it is good enough.
3: Drill holes....and silicone the plate onto the light unit.....I tried Aquarium Silicone but it was out of date and didn't hold the light unit, I think it may have been a combination of out-of-date and the heat from the unit?
I let the new silicone cure for 24 hours as per the instructions.
" The above silicone is used for cookers and high temperatures I assume it is safe enough"
4: Push the screws through the holes and use masking tape to keep them in place, flip the lid over add two washers per screw as spacers, and fit the light unit onto the screws, add the nuts, and tighten up!
5: Finished
End note!
You could take the Twinstar apart drill holes through the top of the light unit and attach it to the face plate!
I will let you know if the light unit has detached itself from the silicone and is in the aquarium tomorrow 🤞
Twinstar is still on the plate as of 19th Nov 2024!
hoggie
Last edited:

