NotoriousENG
Member
Hi everyone,
Having recently finished school I finally have time to set up a planted tank, my first since 2016. So this tank is my return (homecoming perhaps) back to the hobby. I had initially planned to use an old 20 long I had on hand along with leftover equipment from my last tank to get the tank set up quickly and cheaply. Then once running, I would slowly upgrade equipment to work towards my ultimate goal of having no equipment visible in the tank. As often happens, I saw red and things quickly spiraled out of control which led me to the current build that is nearing completion. The current builds specs are:
Tank: 20 gallon long drilled for Eshopps Eclipse S overflow
Stand: Cheap open stand from Petco. Retrofitted with a floating wooden top panel and sump shelf
Filtration: 10-gallon sump with a baffle-less layout for simplicity and to limit splashing. Media is three two-inch-thick sheets of poret foam. The powerhouse of the sump is the Jebao DCP 2500 return pump
Lighting: Old 36" Finnex Ray2 DS leftover from my last tank. This light is longer than the tank and much too powerful so I jerry-rigged a hanging system for it.
CO2: Pressurized fed into DIY cerges reactor that Tees off the main return line
Substrate: Planning on dirt with black diamond blasting sand
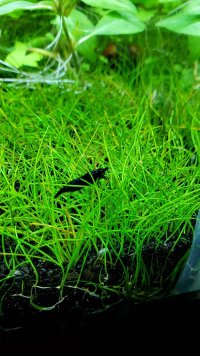
Flora: Planning to focus on rooted plants and epiphytes- mainly crypts, buce, anubias, moss, small swords, and a dwarf hair grass carpet
Fauna: Struggling with this as my water is a bit hard and alkaline. Tentatively thinking about white clouds and neo shrimp. Possibly a few peacock gudgeons once the shrimp population is built up.
Ferts: TBD, likely a dialed-back version of EI as that worked well for me in my last dirted high tech tank
Hardscape: Wild-caught driftwood and a yet-to-be-picked variety of rock.
Given that this a small tank and I thought cramming in a sump and a bunch of equipment was a good idea I've decided to tentatively call this tank "Enigma". Particularly because I'm planning to keep white clouds and few if any stems. Bit of a more unusual build from what I've seen, but maybe I just like to think I'm special") .
.
Now the important part - pictures!
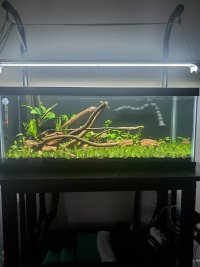
Here is the tank as it stands now, 24 hours into leak testing part two. Note that the light is not hanging in this picture as I'm currently using it to try and grow some cutting out emmersed while I wait on the last few parts of the build. Please excuse the chaos going on behind the tank, tank building is messy work. Also, don't mind the glaring white plumbing as I plan to spray it all black once it passes leak testing.

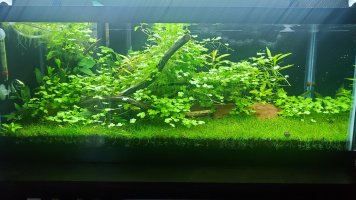
This next picture shows how the sketchy light hanging system works. It also features two gorgeous pieces of seriyu stone that I sadly don't think I will be using since I don't want to make my water any harder then it already is.

If you look closely in the above pictures you'll notice that the tank is drilled for the return, but not in the first pictures. That's because I broke the first tank and decided to not drill in the return as the leaking bulkhead threads and stuck return union were the cause of the breakage. Instead, the V2 version of the tank uses an over-the-top return.


After the pipe is painted, I will be using pipe straps to fix the return in place to make sure its straight. I will also be using them on the drains to take pressure off the overflow bulkhead.
Here is the sump shelf prior to painting. Its made from scrap, end glued 2x4s that are cross-braced on the underside with more 2x4. Since dimensional lumber is never very dimensionally correct, I had to hand sand the top flush. This only took about 8 hours of constant sanding since a cordless is drill is the only power tool I have right now (downsides of apartment life).

Having recently finished school I finally have time to set up a planted tank, my first since 2016. So this tank is my return (homecoming perhaps) back to the hobby. I had initially planned to use an old 20 long I had on hand along with leftover equipment from my last tank to get the tank set up quickly and cheaply. Then once running, I would slowly upgrade equipment to work towards my ultimate goal of having no equipment visible in the tank. As often happens, I saw red and things quickly spiraled out of control which led me to the current build that is nearing completion. The current builds specs are:
Tank: 20 gallon long drilled for Eshopps Eclipse S overflow
Stand: Cheap open stand from Petco. Retrofitted with a floating wooden top panel and sump shelf
Filtration: 10-gallon sump with a baffle-less layout for simplicity and to limit splashing. Media is three two-inch-thick sheets of poret foam. The powerhouse of the sump is the Jebao DCP 2500 return pump
Lighting: Old 36" Finnex Ray2 DS leftover from my last tank. This light is longer than the tank and much too powerful so I jerry-rigged a hanging system for it.
CO2: Pressurized fed into DIY cerges reactor that Tees off the main return line
Substrate: Planning on dirt with black diamond blasting sand
Flora: Planning to focus on rooted plants and epiphytes- mainly crypts, buce, anubias, moss, small swords, and a dwarf hair grass carpet
Fauna: Struggling with this as my water is a bit hard and alkaline. Tentatively thinking about white clouds and neo shrimp. Possibly a few peacock gudgeons once the shrimp population is built up.
Ferts: TBD, likely a dialed-back version of EI as that worked well for me in my last dirted high tech tank
Hardscape: Wild-caught driftwood and a yet-to-be-picked variety of rock.
Given that this a small tank and I thought cramming in a sump and a bunch of equipment was a good idea I've decided to tentatively call this tank "Enigma". Particularly because I'm planning to keep white clouds and few if any stems. Bit of a more unusual build from what I've seen, but maybe I just like to think I'm special
.Now the important part - pictures!
Here is the tank as it stands now, 24 hours into leak testing part two. Note that the light is not hanging in this picture as I'm currently using it to try and grow some cutting out emmersed while I wait on the last few parts of the build. Please excuse the chaos going on behind the tank, tank building is messy work. Also, don't mind the glaring white plumbing as I plan to spray it all black once it passes leak testing.
This next picture shows how the sketchy light hanging system works. It also features two gorgeous pieces of seriyu stone that I sadly don't think I will be using since I don't want to make my water any harder then it already is.
If you look closely in the above pictures you'll notice that the tank is drilled for the return, but not in the first pictures. That's because I broke the first tank and decided to not drill in the return as the leaking bulkhead threads and stuck return union were the cause of the breakage. Instead, the V2 version of the tank uses an over-the-top return.
After the pipe is painted, I will be using pipe straps to fix the return in place to make sure its straight. I will also be using them on the drains to take pressure off the overflow bulkhead.
Here is the sump shelf prior to painting. Its made from scrap, end glued 2x4s that are cross-braced on the underside with more 2x4. Since dimensional lumber is never very dimensionally correct, I had to hand sand the top flush. This only took about 8 hours of constant sanding since a cordless is drill is the only power tool I have right now (downsides of apartment life).
Last edited by a moderator:
 .
.