• You are viewing the forum as a Guest, please login (you can use your Facebook, Twitter, Google or Microsoft account to login) or register using this link: Log in or Sign Up
Joined
20 Dec 2019
Messages
614
Location
South Carolina
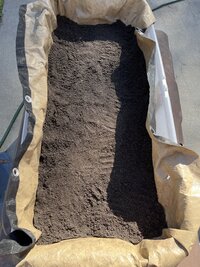
This is for all those weary of setting up a dirted style tank, the results speak for itself. This tank has a base layer of crushed lava rock, pond soil (DynaDirt-US based pond lily soil), and capped with blasting sand. I used @Tim Harrison method of laying down a soil retainer between the soil and sand, and NEVER have issue with the soil surfacing. Tank has been running since the spring, and I’ve removed and added plants here and there to my liking.

So take the dive, and enjoy!

D4CC48B0-A187-49E2-96AF-245EE5A3F4E7.jpeg
C9981024-2309-409E-8ED1-529ABA6A1A80.jpeg
 
That looks stunning. Did you take the pond soil right out to the edge of the tank or just under the island?
 
That looks stunning. Did you take the pond soil right out to the edge of the tank or just under the island?
Thank you for the kind words. And yes soil is strictly in the island. It’s about 2-3 inches thick, and then another 3 inches or so of sand on top.
 
That is stunning. Nice fish choice as well 👍
Thanks Tim. Yes I really love the praecox, however, I’ve learned they are a touchy strain of rainbows. They seem to just die off randomly, stop eating, appear to gasp at the surface, and then disappear. They are apparently the weakest strain of rainbow, but I love them.
 
Reviving this thread up again. I did a rescape that was not well executed and rushed, resulting it poor growth and a lack of maintenance. Tank is now just in limbo with mainly crypts, moss, and Java ferns surviving without co2 or added ferts.

I will be doing a rescape in the next couple weeks again utilizing soil. I had a nice bag of top soil that is currently going through the mineralization process and once finished, I will add some clay and worm castings as an extra source of slow release insoluble nitrogen. I will probably go with another island style scape like the one above, and cap the dirt with just pool filter sand. I previously used blasting sand but I’m just going to stick with one sand for the whole setup. Not sure on plants yet, but will prob try to keep the stem selection minimal with mostly crypts and epiphytes.
 

Attachments

  • image.jpg
    image.jpg
    3.5 MB · Views: 149
Looking forward to seeing this :) my dirted tank has the best growth of all 8 tanks. Out of interest, how do you determine that the soil has mineralised? I did mine in tank and just waited for it to stop producing ammonia and for the plants to grow before is added livestock. I'd like to do my next one with pre-mineralised soil so curious as to your method.
 
Looking forward to seeing this :) my dirted tank has the best growth of all 8 tanks. Out of interest, how do you determine that the soil has mineralised? I did mine in tank and just waited for it to stop producing ammonia and for the plants to grow before is added livestock. I'd like to do my next one with pre-mineralised soil so curious as to your method.
Not my method, it was coined by a biologist named Sean Murphy and a popular write up was generated on a few forums describing the method. I’ll leave a link below to a cool info graphic on the process.

To answer your question, once the soil no longer has a potent organic smell (rotten or strong smell) and it’s a light, airy/sandy texture, then it’s ready to go.

 
Id like to know more about the soil retainer. Does anyone have a link to Tims thread?
 
Id like to know more about the soil retainer. Does anyone have a link to Tims thread?

this is the most ingenious part of Tim’s guide. I took it a step forward by putting the soil in fine mesh bags for easier cleanup when the tank is rescaped, and for specific placement of the soil bags. The dynamic behind the retainer is to keep the dirt down and avoid any surfacing above the cap that you choose (gravel, sand). It works famously and allows you to uproot plants and make changes without any mess. Most nay sayers for a soil tank have this complaint at the top of their list, and this solves that problem. If you’re willing to put in some minor extra work, a soil tank will reward you. Tim’s guide recommends the use of aquatic compost, a particular product that is not available to us in the US for whatever reason, and so utilizing top soil is really the only option and it’s why everyone has such mixed results. A way of leveling the playing ground is by mineralizing, essentially preparing the soil for a submerged state and binding the nutrients to the soil so that they are no longer completely soluble and leach out. I’ve done Tim’s method of allowing the dirt to basically mineralize itself as it matures in the tank, but I haven’t always had great success that way and I believe it’s because the soils I’ve used in the past were “too hot.”

If you follow Tim’s guide, follow it to the T and you’ll find great results. If you don’t have access to pond soil or aquatic compost, I’d consider the mineralization technique.
 
Only Lovuu 1mm Mesh Holes Aquarium Filter Bags, Fish Tank Media Mesh Bags with Plastic Zipper for Charcoal Media, Bio Balls, Ceramic Rings, Ammonia Remover (10 Pack, Large, Black) https://a.co/d/2BQwq07

These are what I purchased, they were pretty cheap too.
 
Happy plants in there!

I've seen a number of new topsoil projects and I think it's worth pointing out that the best material to start with is regular, natural black topsoil. There is quite a lot of confusion with many hobbyists using composted manure, shredded bark or peat-based potting mixes, which aren't really soil at all. Natural black topsoil is already pretty much in a mineralized state, so it may not be necessary to perform this step. Since it doesn't really have a mineral soil component, a thorough biological mineralization of a potting mix will just burn the material up with the carbon escaping to the atmosphere and leaving almost nothing but the perlite or vermiculate content.
And there in lies the problem. Unless you have a landscape supply nearby, or have access to decent soil in your own backyard, commercial “top soils” for the most part are not actually soil at all. As you’ve already mentioned, most bags are filled with nonsense and filler, and not much dirt at all. Hence why when some go through the process, they are left with maybe a 1/4 of the 50lb bag they started with. The bag I happened to have on hand was mostly black dirt with only maybe 10-15% of impurities, and that’s hard to come by. It’s really a luck of the draw with commercial products nowadays.
 
Okay, as promised, I started my reboot. The tank was stripped down completely and the rocks were power washed and replaced the spiderwood with Malaysian driftwood. The base layer is a mixture of old ADA AS and Safe T Sorb, and sprinkled some potash on top. I then laid down six media bags of MTS with a mixture of 10-15% peat moss/worm castings. It was capped off with pool filter sand that was also contaminated with some blasting sand, but I think the speckled look looks more natural so I left it alone.

Today I did the hardscape and I’m quite happy with how it turned out, let me know your thoughts. In the center between both pieces of driftwood will be tiger lotus, a nice blooming red. Haven’t decided on stems in the background yet but the front of the hardscape will be epiphyte heavy where it’s more shaded, as well as crypts in the substrate.
F22EAB73-DF0A-4FC5-90F9-5421BD7DCFE7.jpeg
68ACE6A9-4244-4CF4-836F-A2F34C5A6AC3.jpeg
380E4BDB-BED5-4DAA-AFF3-E37806BD9FA9.jpeg
3F8CE8BA-A399-4EAD-A907-A4D1846751E8.jpeg
133252FD-52D3-4692-8CC6-350E5072966B.jpeg
333AB81F-5625-48DE-B8CC-CA18C0385AD2.jpeg
 
Recieved my plants a few days ago and the tank has since been planted. Here’s the list of plants: Java Fern Petite and India, Anubias Nana Petite and Paxang, Bucephelandra red mini, Pilo Moss, Riccardia Chamedryfolia (Mini Pellia), Hygrophila Pinnatafida, Red Tiger Lotus, Juncus Repens, Staurogyne Porto Velho, and a mixture of Crypts (Lucens, Petchi, Wendtii, Undulatas).

Currently running my Twinstar S II at 50% for 6 hours, and CO2 on 3 hours before lights on. Front load dosing KNO3, KH2PO4, and K2SO4 (10, 3, 20), and right now I’m dosing GLA’s Micromix with DTPA to Fe of 0.20 three times a week.
07F2964A-29EF-46A2-B46A-ADC6A0C253E4.jpeg
0B452F5F-C1FD-4AB6-A04B-FB925C3CFB45.jpeg
9D6DFF6E-0D30-422C-B19B-B15D90F4A813.jpeg
 
Just a week’s update, not much has changed. Planting in the pool filter sand was such a breeze. I honestly love it more than BDBS that I used previously. My only concern was its visibility but once plants fill in it’ll be pretty non existent. My peacock gudgeons are truly enjoying this scape because I almost never see all of them unless it’s time to eat, they have been in and out of the cracks of the rocks and driftwood. I have 6 of them in there and three neon rainbows, but I’m looking to get another group of fish to take the neons place. They just don’t last for me and all the ones I’ve ever purchased were through aqua huna so I’m not sure on the quality that I’m receiving. I’ve been considering M. Parva but not sure if I want to go with a bigger fish or a very large group of smaller fish. Any thoughts on stocking?
86BD03AB-B319-4057-A3BC-7B5486A12869.jpeg
 
Back
Top