• You are viewing the forum as a Guest, please login (you can use your Facebook, Twitter, Google or Microsoft account to login) or register using this link: Log in or Sign Up

How to use a PLC to control your fish tank.

But cheap compared to RTD and thermocouples, they also dont have the same degree of accuracy :bored: but we dont need that degree of accuracy for a fish tank, after all who has their tank at 26.347 degrees? tenth of a degree is plenty IMO

Spot on the key here isn't accuracy, it's repeatability.
 
Well I have been working on the next version of the software the version 4.4, the TankyMcTankFace version. :jimlad:

One of thing I wanted my controller to do (though didn't do on initial design, as I wanted to get something that worked), was to be able to just set one timer for the time I wanted my tank lights on eg 3pm to 11pm and have all other device on/off times be calculated based on these times. For instance turn CO2 on 2 hours earlier than light on 1pm, and off one hour before lights eg 10pm. Same for brighter lights, wave maker, air pump etc. Then if I see algae starting to appear just simply reduce light on time by an hour or two, edit one timer )on front panel or via web front end) and have all other times change as well.

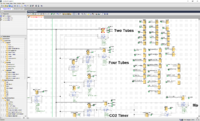
Below is the link to the Logo!SoftComfort source file, for those of you following along at home.;)

https://1drv.ms/u/s!AgIGUdnorxMQtOVYVFg_yKAQNkwz9g

Basically the functional block diagram is largely the same, so same output relays and inputs from switches to turn on/turn off/disable/enable lights and devices.

However there is now a new bit that reads the time values from the timer block from the PLC memory. This makes use of a facility to map functional blocks "internal parameters" eg timer on time, to memory. Use the Tools->Parameter VM Mapping to set this up. Below shows the parameters for two timers (normal and holiday times) being mapped to memory locations 0 to 6.

upload_2017-7-25_12-53-8.png


This value can then be accessed using a network analogue input as shown below. The value read is 5888 for timer on time.
upload_2017-7-25_13-26-13.png


Unfortunately the read value is in binary coded decimal format :( so is not immediately useful for calculations.
https://en.wikipedia.org/wiki/Binary-coded_decimal

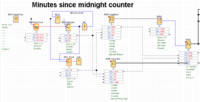
The value read above, 5888 is in 1700 in BCD (use windows calculator to convert decimal to hex), and 17:00 is the actual timer value. To convert BCD to decimal value (no of minutes since midnight) the following calculation blocks are used. As can be seen this converts the read value of 5888 to 1020 (decimal), thus 1020 minutes since midnight ie 17:00 hours.

upload_2017-7-25_13-28-16.png


This is then fed to analogue threshold trigger to determine if the lights (or other device) should be on or off. Below shows the diagram for two tubes on/off based on the time (more on that later) being between the values 1020 (17:00 hours) and 1380 (23:00 hours).

upload_2017-7-25_13-32-29.png


Unfortunately one cannot get access to the Logo real time clock values, so a couple of blocks are devoted to counting minutes since midnight. A timer resets the counter minutes at 00:00 hours every day. This does have the issue that when the unit is first powered up the time is 00:00, so a menu setup is provided to set the initial time.

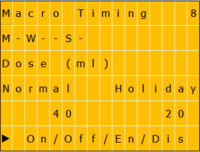
One other change (as we can now calculate things) is the macro, micro and liquid carbon dosing values are now set in millilitres based on rated pump rate. Below shows dosing 40ml macro on Monday, Wednesday and Saturday and only 20ml if in holiday mode. The 40 & 20 can be modified to change the dose depending on your tank size.

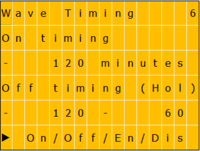
The rest of the "new stuff" is devoted to on screen menus to allow parameters to be edited either from LCD screen or remotely over the web. One can edit the no of minutes early CO2 starts, CO2 ends, wave maker starts/end etc. Below 4 T5 tubes turn on 60 minutes after the initial start time and go off 60 minutes before the end time. Similar for CO2, wavemaker & air pump.
upload_2017-7-25_13-46-12.png


One variation I wanted, was to leave wave maker on longer when on holiday, so if in holiday mode it is on for all the time CO2 is on. Non holiday mode turns off 240 minutes before lights off, so that when I am in the lounge, where the tanks is, in the evening there is no faint hum of wave maker.
upload_2017-7-25_13-53-2.png


Another issues is I like to run my air pump from 15 minutes before lights of (to degas CO2, provide extra tank agitation and pass air through my fish feeder) say 2am. Unfortunately with this design times cannot cross the midnight boundary, as the minutes counter gets reset at midnight, thus in my case air will come on 10:45 till 00:00 (rather than 2:00). Oh well, something for the next version to fix.:meh:

Anyway enjoy.
 

Attachments

  • upload_2017-7-25_13-32-16.png
    upload_2017-7-25_13-32-16.png
    143 KB · Views: 194
  • upload_2017-7-25_13-44-23.png
    upload_2017-7-25_13-44-23.png
    5.5 KB · Views: 194
  • upload_2017-7-25_13-44-44.png
    upload_2017-7-25_13-44-44.png
    5.5 KB · Views: 199
  • upload_2017-7-25_13-51-27.png
    upload_2017-7-25_13-51-27.png
    5.8 KB · Views: 207
Hmm midnight issue:geek: starts 0 stops 1440, add another threshold trigger to start at '0' other threshold trigger stops itself on reset of counter. Maths instruction block to work difference out link to V2 of new threshold tigger, add OR block for both triggers and relevant connections eg

upload_2017-7-25_20-49-32.png


maybe! cant see an issue ATM But havent checked how the Pulse relay B116 responds?
 
Currently on holiday...not quite still at Gatwick..but I just added another delay timer for 5 hours so that air runs for 5 hours when in holiday mode.

When I get back might modify if I can remember anything fish and plc wise after 3 weeks of Disney, SeaWorld and Universal Studios..
.
 
Had a think about it today, had a look at your tank controler program again tonight and very impressed the timer works great with just Hol lights and normal lights settings :cigar::pompus::clap:.
The extra analog threshold I added works well to for the extra time of the airstone is added back on clock/counter reset at midnight too
Shame we cant get it to set the time on startup. I do upload my data log so needs a start/stop, but having retentively on B007 and B005 UP Down Counters sorts that out with a minimal effect if quick. Just the initial startup/upload which your time setting screen sorts out nicely:thumbup:

Think I will be doing a copy paste in the near future ;)

Does the Min Clock B004 still work on a power off? and the Mins and Hours counter still count, as its stops in simulation mode when power is turned off
 
Now in Walmart Florida.

No the clock pauses on power cut, but will resync at midnight.
 
After Ian's great work on the version 4.4 with his self adjusting timer settings -One ON/Off time sets them all :thumbup:.

Got me thinking :bookworm: after I worked out how he had done. The idea of having a self adjusting CO2 on time based on the input from my pH controller. So copied his programing and got to work

Most is the same as Ian's except the settings OFC except the all new CO2 self adjusting on time control :cigar:

upload_2017-8-7_20-14-16.png


It basically records the on time from the CO2 injection starting say 120mins before lights on time, then records the time it reaches the target pH, one minus the other and presto 43 minutes. Then the next day it starts 43 minutes before light on time, thats 827 Minutes in the above pic. First day it failed as the signal from the pH controller comes on then instantly goes of as the control starts up, so just added a 60second off delay and presto. have a counter so it only uses the first signal of the day with resets at midnight.

Yes it was a fast rise in pH but with new reactor fitted and lower pH than normal due the acclimatising some pH sensitive Theo snails.

Could also do it so it takes the average of several days - next version maybe, will see how it goes
 
PLC 'Thor'

Been using sons Power Management System whilst he was home from uni, which is Okish but lacks ethernet so you need USB to access it and it doesnt like power offs, plus fine control seems a little clumsy. Son uses it close to his PC so it works great for his High Tech tank but he also manually doses ferts. I wanted to do auto ferts as well.

I wasn't limited with space as it was going above kitchen unit, so to keep both PLC systems compatible with future possible project I decided on the
Siemens LOGO! 8 Logic Control Without Display, Ethernet RJ45 Communication, 8 x Input, 4 x Output so needed a PSU so saved a bit of cash and got
Switch Mode DIN Rail Panel Mount Power Supply, 36W, 24V dc/ 1.5A twice the size of the Logo PSU but third the price
enclosure
TEMPO ABS Enclosure, IP65, 240 x 191 x 107.4mm
A Few Wago 2000 series terminal blocks for 35mm Din rail and a few Glands.
other bits I already had.

upload_2017-9-16_10-21-18.png

upload_2017-9-16_10-22-21.png


Couple of vents for passive cooling
upload_2017-9-16_10-23-21.png


stuck it above kitchen unit and done.

Software design was very straight forward using Ian's 'one time to set them all' design.

No display on the siemens unit but accessing it via ethernet was straight forward, just connected direct to PC via ethernet cable (removing cable from LAN) open Logosoft software, network project, go online and it poped up, right click properties then set the IP address and the default gateway, saved then connected back up to the LAN, all worked great. did the other properties settings for time servers, web admin etc, uploaded software working great. Turn lights on with phone when folks turn up ;)
upload_2017-9-16_10-36-35.png
 
If any of you (other than Zeus) used a Logo PLC, there is a firmware upgrade for the later FS:04 and FS05 models. These appear to have an issue of display and web front end locking up after 50 days.

Siemens have released a firmware fix to upgrade to firmware V1.81.03 which corrects the lock up issue.
https://support.industry.siemens.co...on-on-logo!-8-fs:04-and-fs:05-?dti=0&lc=en-WW
and
https://support.industry.siemens.co...e-for-logo!-8-fs:04-and-fs:05-?dti=0&lc=en-WW

Upgrade is via a file on the uSD card. Load file onto card, insert card and power on.
Clears & resets the Logo after installation.
Needs SoftComfort 8.1.1 to access and reload your Logo afterwards.
 
brilliant work here guys, this thread has inspired me to do my own setup. I am planning on keeping as simple as possible and only running 4 items being - CO2 solonoid(230v, led power supply(230v) , 1 macro pump, 1 micro pump
i was looking at getting the 230v logo 8 and an abs box to contain all components and wiring
i am only unsure about the dosing control as most of the pumps i see are 5-12v , in theme with keeping it simple should i just use 2 x 12v adaptors 1 for each dosing pump or can you suggest an easier route to take
 
You can use any pump as the base unit just uses a relay and you just need a power supply. I copied Ian's Auto dosing setup pumps which do come in 240v so no need for PSU. Quality pumps too, work out about £50 each for four rollers.
You could just get a DIN mounted PSU to run lower voltages too. I would recommend the WAGO 2000 series connectors, nice and slim and RS components do stock them.

Sent from Mountolympus via neural interface
 
i am only unsure about the dosing control as most of the pumps i see are 5-12v , in theme with keeping it simple should i just use 2 x 12v adaptors 1 for each dosing pump or can you suggest an easier route to take
If using 12V pumps you only need one 12V supply as only one pump will be going at a time....

Personally if going for the 230V Logo I would try and go for 230V peristaltic pumps, one less 12V transformer/plug to wire up.

These are the peristaltic pumps Zeus and I used. Blimey price has gone up since I got mine (£42)...bet all down to € issues....:( (I stand corrected see post below, £42 ex VAT is for 115V versions)
http://www.williamson-shop.co.uk/100-series-micro-peristaltic-pumps-214-c.asp

Here is the thread where I originally used the pumps, from 2012. I think the 3rpm quoted in article is wrong it is actually 15rpm.
https://www.ukaps.org/forum/threads/diy-dual-peristaltic-dosing-pump-with-alternate-switching.22332/

Choose your pump to run as slow as possible for the volume of dose required in a reasonable time. Mine dosed about 3ml per minute thus I run for 7 minutes dosing about 20ml per day.

I used 101.015.230.030/4, which is 101=Norprene tube (lasts longer), 015=15rpm, 240=240V, 030=3mm tubing and /4 = 4 roller. Use 4 roller and no one way valves are required. According to their graph on spec sheet, 3.0A60F (3mm Norprene) gives just over 0.15ml per revolution, so at 15rpm is about 2.5ml/minute.

This is where to get your 240V starter kit from. Includes fully licenced SoftComfort development software.
http://uk.rs-online.com/web/p/logic-modules/8384889/

Keep us informed of your design choices...and any questions just ask.:D
 
Last edited:
HI Ian,
Very intresting as my other hobby is electronics and I use the Arduino for various projects, to date the most useful as been a seed propagator that controls the heat according to how much light is available, this controls via a relay (OK should be a triac) a metre length of heating cable in a wooden box, holding 2 standard seed trays. If you take a look here: www.melsaunders.co.uk You can see some of my projects (mostly Robotic/buggies) etc. I do keep meaning to get to doing something for a least one tank, basic to start, anyone local to Leicester interested??
 
So as your hobby is electronics you should have no problem wiring up safely and correctly a Siemens PLC. You have some interesting things on your site.

Have you tried the SoftComfort software, available as a demo download ? Tried it once and that was it....this is the way forward.

Search for Siemens Logo Case gets some interesting hits. Just an idea.

upload_2017-10-13_21-3-53.png
 
Well here is V4.5 of my software for any of you "following along at home" :cigar: and need to be OCD complete....

There were a couple of issues with V4.4, niggling in my mind, that after being prodded by Zeus I have fixed.
1. The clock/outputs only changes by an hour, one day after the clocks change to summer/winter time. This is because the clock counter is only reset at 12:00am. Thus controller runs 1 hour out for a day.
2. The air pump can't run beyond mid night.

So both of these are fixed.

By resetting the minutes past midnight counter(s) to 4 am rather than 12 am this means count is correct as internal clock is automatically adjusted at 2/3am for summer/winter time. So resetting count at 4am after clock change ensures minutes past midnight count is correct. Also needs processing at the output, as the minutes count now continues past, 1440 minutes (midnight), to be reset at 4am. One could in fact just ignore this, as hopefully you won't have your lights, CO2 etc on from 12am to 4am. However using block B358 we check to see if count is over 1440 minutes (24 hours, midnight) and use MUX B359 to mux in (count - 1440) so count rolls over to 0 at midnight.

This enables us to fix the running of items beyond midnight by using block B355 count which counts beyond midnight (until 4am), rather than B359 which resets at midnight.

upload_2018-3-28_15-39-11.png


Link to code below.
https://1drv.ms/u/s!AgIGUdnorxMQzbVMVFa6mnExLERt6A
Enjoy:).
 

Attachments

  • upload_2018-3-28_15-28-4.png
    upload_2018-3-28_15-28-4.png
    25 KB · Views: 183
Chaps,

I'm seriously considering a PLC for my tank.
Tried to absorb as much from this thread as possible, but still unsure/recovering from a headache.

Main aims:
Able to connect a temp probe right away to control the heaters.
Able to connect a PH probe some time down the line.
Rest is the usual suspects: lights, pumps, wave makers etc.

I am not bothered about what voltage the PLC uses, as long as all modules use the same. Feels more straight forward that way, correct me if im wrong!

Ive seen these models at RS components:

12/24V PLC: rs ref 8251644
Siemens ref 6ED1052 1MD00 0BA8

24V expansion: rs ref 8251672
Siemens ref 6ED1055 1CB10 0BA2

Software rs ref 8251672
Siemens ref 6ED1058 0BA08 0YA1

Will these do?

Thanks
Fil
 
Back
Top