
Julian
Member
- Joined
- 20 Jul 2013
- Messages
- 688
I started this hobby a few years ago and this will be what I consider my first (proper) attempt at an Aquascape. I always thought of my previous attempts as testing grounds to teach myself the basics and gain experience.
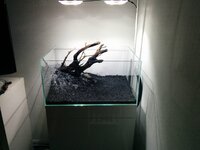
Here's a pic of the old tank:

I learnt a lot of hard lessons about CO2, flow and Algae while I had this tank. A few months after installing a pressurized CO2 system, while trying to get my DC to turn the right shade of greeny-yellow, I came home one day and my drop checker had turned orange. Needless to say there were lots of casualties that day, but I persevered. Next time around I decided that I needed more lights which quickly resulted in a tank full of BBA and Cyanobacteria. I had to strip down the entire tank and buy completely new substrate it was that bad, but another lesson learned.
I realised from the beginning there would be a steep learning curve in this hobby (learning-crater in my case), but I knew that one day I would have the experience to produce something similar to the pictures that inspired me to take it up in the first place. And today is that day! Or at least it will be once things have grown in a little and it's been flooded...
Details:
TMC Signature 600 (60x45x30) + Arctic White cabinet
Lights are 2x TMC Mini 400's mounted onto my DIY luminaire.
Substrate is a mixture of Eco Complete and pure white Silca sand to help bulk it out.
FE + CO2 Art Regulator + bubble counter UP inline Atomizer.
APS 1400 Filter (soon to be upgraded to a Fluval 206).
Hydor 300 inline heater.
Plants:
Glossostigma Elatinoides
Hemianthus Callitrichoides
Eleocharis Parvula
Staurogyne Repens
Hydrocotyle Tripartita
Java Moss
There's also a few old cuttings of Rotala rotundifolia which I don't expect to survive. Once the tank is flooded, depending on how well these do, I will replace them with some new ones.
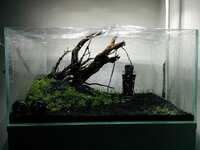
And now for the pictures!


Installed some holes for the filter pipes:

Not being happy with a red fire extinguisher and keeping with colour of the cabinet:


Incase you were wondering how I made the jars magnetic:

Substrate in:

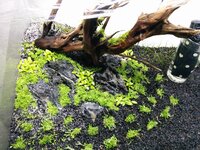
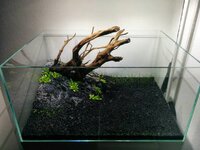
And then the hardscape:


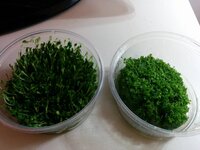
Plants I'd had growing in a propagator since I tore the old tank down:

Some HC and Glosso from freshwatershrip.co.uk (excellent service and communication btw).


Lights are on 90% for 9 hours, humidity is at 80% and temp is about 24C. I've learnt in the past that any higher than this and things start to get moudly.
More pics in a week!
Here's a pic of the old tank:
I learnt a lot of hard lessons about CO2, flow and Algae while I had this tank. A few months after installing a pressurized CO2 system, while trying to get my DC to turn the right shade of greeny-yellow, I came home one day and my drop checker had turned orange. Needless to say there were lots of casualties that day, but I persevered. Next time around I decided that I needed more lights which quickly resulted in a tank full of BBA and Cyanobacteria. I had to strip down the entire tank and buy completely new substrate it was that bad, but another lesson learned.
I realised from the beginning there would be a steep learning curve in this hobby (learning-crater in my case), but I knew that one day I would have the experience to produce something similar to the pictures that inspired me to take it up in the first place. And today is that day! Or at least it will be once things have grown in a little and it's been flooded...
Details:
TMC Signature 600 (60x45x30) + Arctic White cabinet
Lights are 2x TMC Mini 400's mounted onto my DIY luminaire.
Substrate is a mixture of Eco Complete and pure white Silca sand to help bulk it out.
FE + CO2 Art Regulator + bubble counter UP inline Atomizer.
APS 1400 Filter (soon to be upgraded to a Fluval 206).
Hydor 300 inline heater.
Plants:
Glossostigma Elatinoides
Hemianthus Callitrichoides
Eleocharis Parvula
Staurogyne Repens
Hydrocotyle Tripartita
Java Moss
There's also a few old cuttings of Rotala rotundifolia which I don't expect to survive. Once the tank is flooded, depending on how well these do, I will replace them with some new ones.
And now for the pictures!
Installed some holes for the filter pipes:
Not being happy with a red fire extinguisher and keeping with colour of the cabinet:
Incase you were wondering how I made the jars magnetic:
Substrate in:
And then the hardscape:
Plants I'd had growing in a propagator since I tore the old tank down:
Some HC and Glosso from freshwatershrip.co.uk (excellent service and communication btw).
Lights are on 90% for 9 hours, humidity is at 80% and temp is about 24C. I've learnt in the past that any higher than this and things start to get moudly.
More pics in a week!
Attachments
-
 4UOZ7rA.jpg695.4 KB · Views: 82
 -
 rAewC4i.jpg68.2 KB · Views: 105
 -
 sBlDDAx.jpg471.9 KB · Views: 108
 -
 BciSVuJ.jpg363 KB · Views: 86
 -
 PPJCTdB.jpg187.5 KB · Views: 98
 -
 4UOZ7rA.jpg695.4 KB · Views: 92
 -
 sBlDDAx.jpg471.9 KB · Views: 112
 -
 PPJCTdB.jpg187.5 KB · Views: 84
 -
 BciSVuJ.jpg363 KB · Views: 92
 -
 rAewC4i.jpg68.2 KB · Views: 101
Last edited:

")
